Label
The Label feature in ZeuZ allows users to create or edit a descriptive tag by entering a label name and selecting a label color. This label can be applied to Requirements, Tasks, Bugs, or Test cases to organize and filter related items efficiently. The page displays tabs showing where the label is used and includes audit information, such as who created or last modified the label and the corresponding dates. After defining the label, the user can save the changes.
Why it matters / Use Cases:
- Better Organization: Labels allow teams to group related items, making it easier to filter and locate them quickly.
- Improved Visibility: By applying labels, stakeholders can instantly see the type, priority, or category of an item at a glance.
- Enhanced Reporting: Labels make it possible to generate reports and metrics based on specific tags, helping track progress or problem areas.
- Facilitates Workflow Management: Teams can use labels to indicate status, responsibility, or stage in the process, improving task tracking.
- Supports Cross-Project Consistency: Standardized labels across projects ensure consistency and reduce confusion when multiple teams work together.
- Quick Filtering and Search: Users can filter or search work items using labels, saving time and avoiding manual sorting.
- Custom Categorization: Teams can relate labels that match their unique workflow, like "High Priority", "UI Bug", or "Regression Test", adapting the tool to their needs.
Prerequisites
- Access to ZeuZ Server with permissions for Project → Others → Label.
- A clear and descriptive name must be defined for the label.
- Choosing a label color helps visually differentiate labels, though it is not mandatory.
- Teams should follow a standard naming approach to ensure labels are meaningful and easy to search.
Quick-Start
- View Labels: There are two tabs: All shows every label in the system and Mine shows only the labels you have created.
- Search Labels: Use the field to quickly locate a label by its name.
- Filter by date (Optional): Click the calendar icon next to the search box to filter labels by creation or modification date.
- Select Per Page Item: Use the dropdown on the right to select how many labels to display per page (e.g., 25, 50, 100).
- Create Label: Click the + New Label button at the top right to create a label, enter the Label name and optionally choose a color in the form that appears.
Features
Create / Search Labels
- Navigate to the Labels page.
- To search for a label, enter the label name or label ID in the search box. The displayed labels are automatically filtered based on our search criteria.

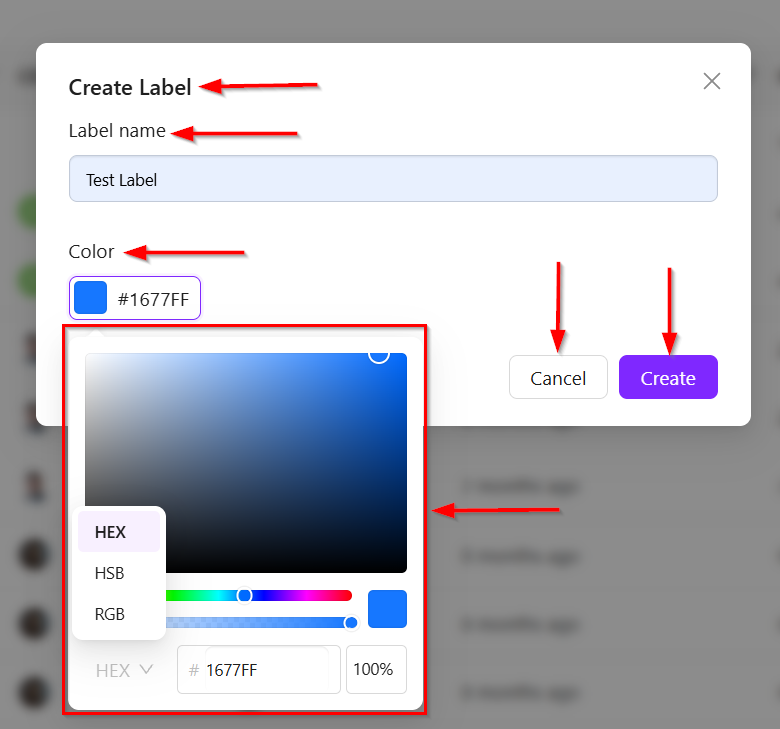
- To create a new label, click the Create Label (+) button to open the "Create Label" window.
- Enter the required fields below, such as:
- The "Create Label" window allows us to create a new label by entering a Label name and selecting a Color.
- Click the color box to open the color picker, where we can choose a color visually or enter a color value in HEX, HSB, or RGB format.
- We can also adjust the color's opacity using the opacity slider.
- After entering the required information, click Create to save the label or Cancel to discard the changes.

- Click the Refresh Labels button to update the label list and display the latest labels available in the system.

Edit a Label
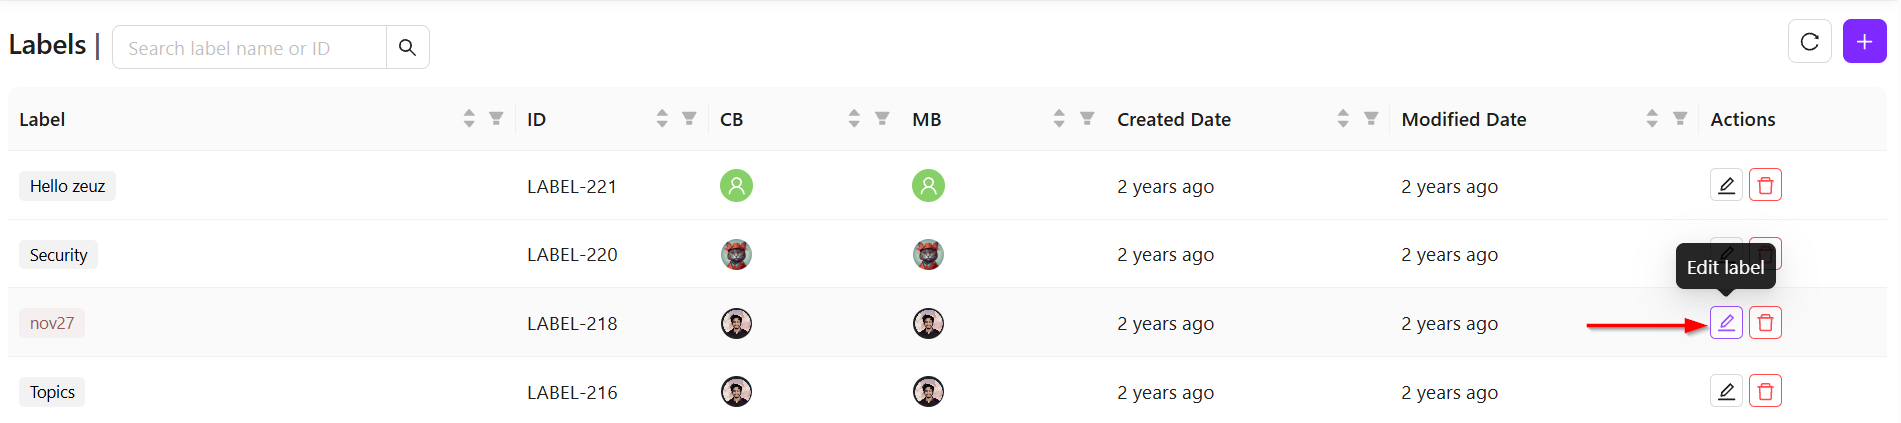
- Click the specific label that needs to be edited.
- To edit a label, click the Edit Label button corresponding to the label we want to modify.
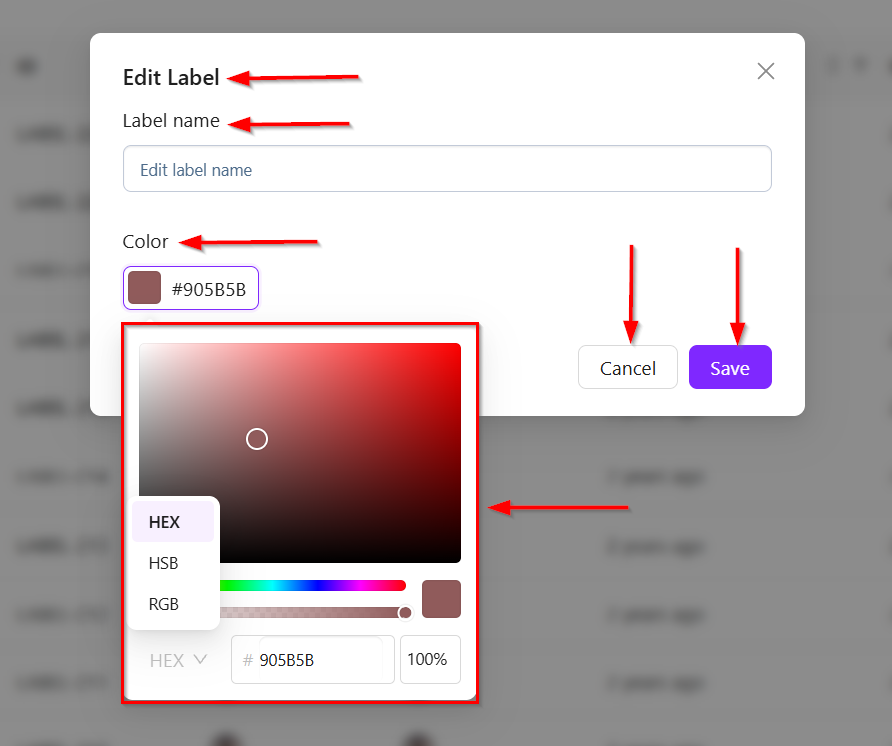
- After clicking the Edit Label button, the "Edit Label" window appears.
- Enter the required fields below, such as:
- The "Edit Label" window allows you to update an existing label by modifying its Label name and Color.
- Click the color box to open the color picker, where we can choose a new color visually or specify it using HEX, HSB, or RGB values.
- We can also adjust the color's opacity using the opacity slider.
- After making the desired changes, click Save to apply the updates or Cancel to discard the changes.
Delete a Label
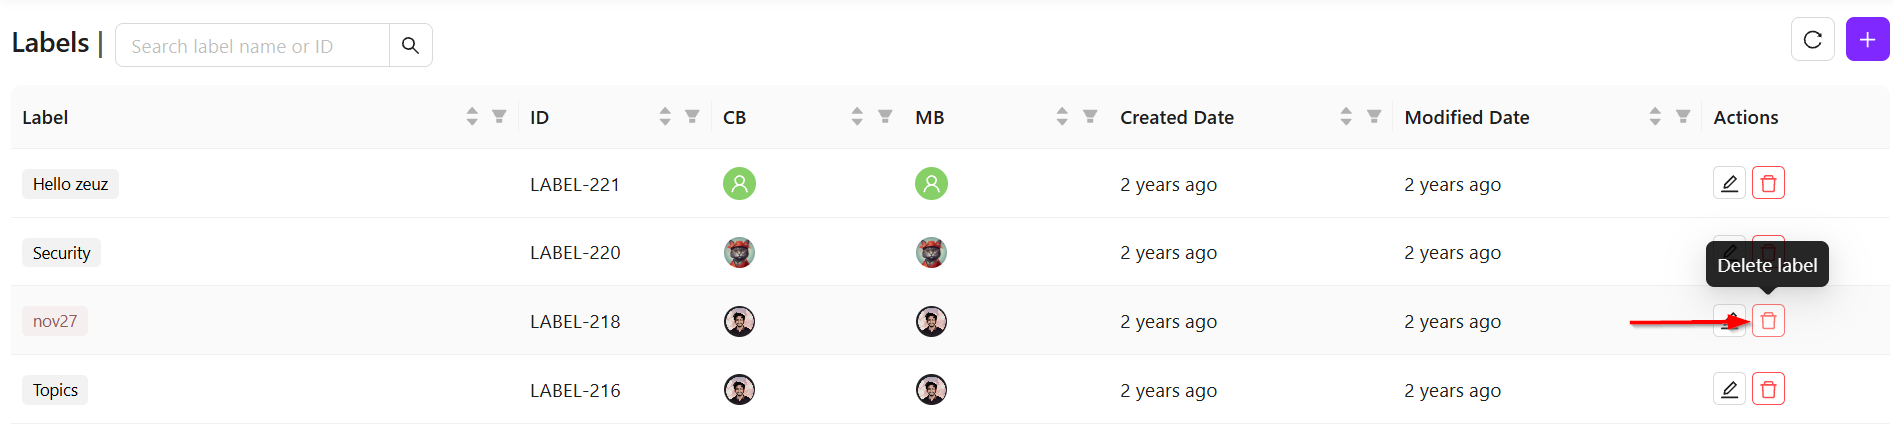
- To delete a label, click the Delete button located on the right side of that specific label.
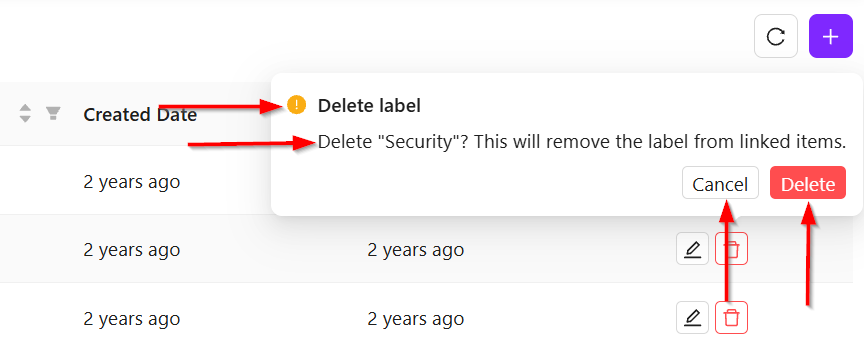
- The Delete Label confirmation dialog is displayed when we choose to delete a label.
- Review the confirmation message, which indicates that the label will be removed from all linked items.
- Click Delete to permanently remove the label, or Cancel to close the dialog without deleting the label.
Managing Labels in the Table
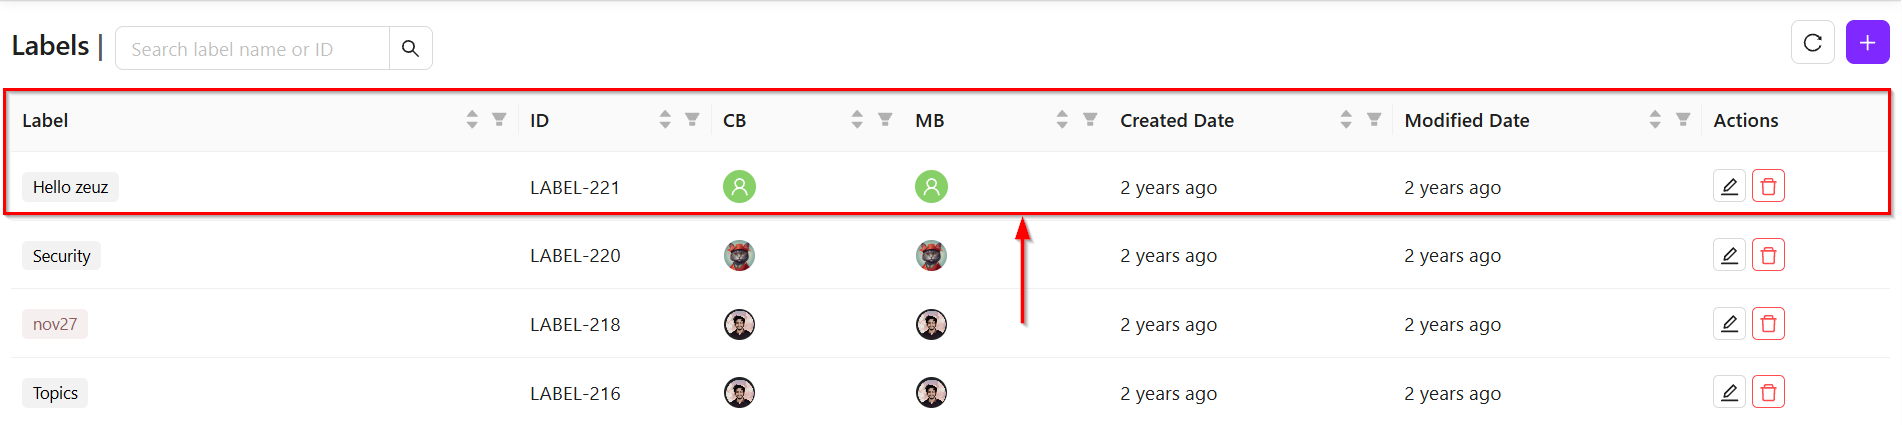
- The Labels Table provides an overview of all available labels in the system.
- The table displays the following details:
- Label: Displays the name of the label.
- ID: Displays the unique identifier assigned to the label.
- Created By (CB): Displays the user who created the label.
- Modified By (MB): Displays the user who last modified the label.
- Created Date: Displays when the label was created.
- Modified Date: Displays when the label was last updated.
- Actions: Provides options to edit or delete the label.
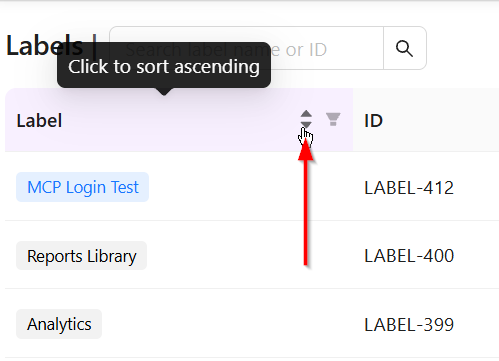
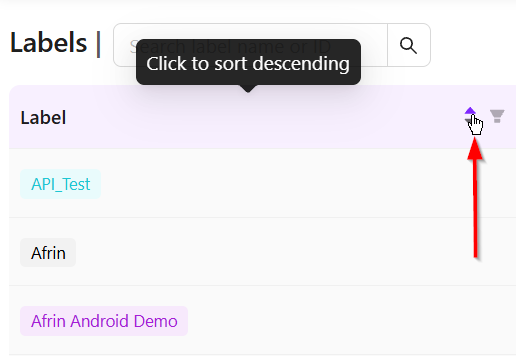
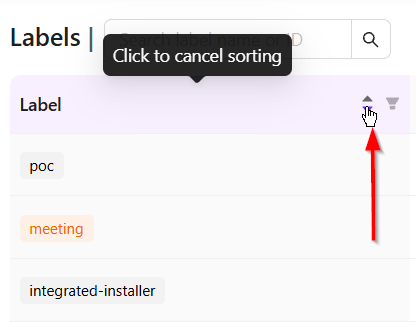
- Each column supports sorting, and selected columns provide filtering options to help locate specific labels, such as:
- Click to sort ascending: It arranges the values in the selected column in ascending order.
- Click to sort descending: It arranges the values in the selected column in descending order.
- Click to cancel sorting: It means removing the applied sorting from the selected column and returning the table to its default order (or the original order defined by the application).
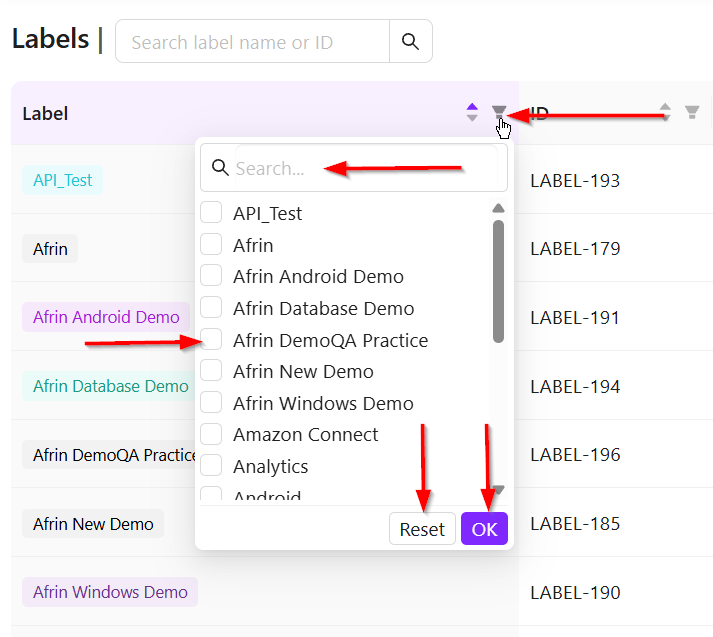
Label Filter
- The Label Filter panel allows users to filter the labels displayed in the Labels Table.
- Enter a keyword in the Search box to find a specific label, then select one or more labels using the corresponding checkboxes.
- Click OK to apply the selected filters and update the table.
- Click Reset to clear all selected filters and display all labels.
FAQs / Troubleshooting
FAQs
What is a label?
A label is a descriptive tag used to categorize and identify items such as Requirements, Tasks, Bugs, and Test Cases. It helps maintain clarity and organization across a project.
Where labels can be applied?
Labels can be applied under Requirements, Tasks, Bugs, and Test Cases. This allows a single label to be reused across multiple areas.
Can an existing label be edited?
Yes. A label can be edited by opening it from the label list, updating its details, clicking Save.
Does a label require a color?
Yes. A color must be selected so the label is visually distinguishable across different project modules.
Can multiple items share the same label?
Yes. A single label can be applied to multiple Requirements, Tasks, Bugs, and Test Cases, allowing consistent categorization across different project components.
Troubleshooting
- Save button is not active: Ensure both the label name and label color fields are filled. The button remains disabled if mandatory fields are incomplete.
- Label does not appear under Requirements, Tasks, Bugs, or Test Cases: The label must first be saved in the Details tab. Without saving, the label cannot be used in other sections.
- Unable to edit the label details: The user might not have edit permissions. Check access rights or contact the administrator.
- Error message for label name: The name may already exist. A unique name must be used, as the system does not allow duplicate label names.
- Color selection is not retained: Make sure to click Save after choosing the color. Navigating away before saving will discard the change.
Changelog
- Introduced before Version [20250518]