Linux Inspector
The Linux Inspector in ZeuZ provides a unified interface to capture, inspect, and extract UI element attributes from Linux desktop applications. It allows QA and development teams to easily build robust locators for automated test steps without relying on guesswork. This makes Linux desktop automation more reliable, consistent, and collaborative across environments.
A ZeuZ Node must be running on the target Linux machine for the inspector to detect and connect to it.
Key Features
- Automatic node detection: Detects the active ZeuZ node on the Linux machine and displays the
Node IDand platform status. - One-click capture: Takes a fresh screenshot of the Linux desktop and downloads the underlying UI element tree.
- Visual element selection: Hover and click directly on UI components in the captured screenshot to select them.
- Tree navigation: Expand and navigate the Element Tree to focus elements with synchronized highlighting on the screenshot.
- Attribute inspection: View detailed properties (IDs, classes, text content, bounds) for any selected element.
- Robust locators: Use captured attributes to build reliable locators for automated test steps.
Why it matters / Use Cases:
- Faster Locator Creation: Allows users to quickly identify UI elements and extract attributes for automated test steps.
- Reduces Guesswork: Eliminates the need to manually inspect Linux applications using external tools.
- Ensures Consistency: Maintains uniform element identification across tests, reducing chances of flaky locators.
- Supports Desktop Automation: Enables Linux desktop UI automation alongside web and mobile testing.
- Enhances Collaboration: Facilitates team access to consistent inspection workflows, improving coordination during test authoring.
Prerequisites
- Access to ZeuZ Server with permissions for the Testing → Intelligence → Linux Inspector.
- A ZeuZ node actively running on the target Linux machine.
Quick-Start
- Start a ZeuZ node on the target Linux machine.
- Open the Linux Inspector panel and confirm the
Node IDand platform status appear at the top. - Click the Capture button (camera icon) in the top-right corner to take a fresh screenshot and download the UI element tree.
- Select an element using one of the following:
- Visual Selection: Hover and click directly on a UI component in the captured screenshot.
- Tree Navigation: Expand and click a node in the Element Tree.
- Review the Attributes Box to view detailed properties of the selected element.
- Use the attributes to build robust locators for your automated test steps.
Features
How to Use the Linux Inspector
1. Connecting to a Node
- Ensure a ZeuZ node is actively running on the target Linux machine.
- Open the Linux Inspector panel. If a node is available, the inspector will automatically detect it and display the
Node IDand platform status at the top. - If no node is detected, you will see a prompt to "Start a node in this machine."
2. Capturing the Screen
- Click the Capture button (camera icon) located in the top-right corner of the inspector.
- The inspector will take a fresh screenshot of the Linux desktop and download the underlying UI element tree.
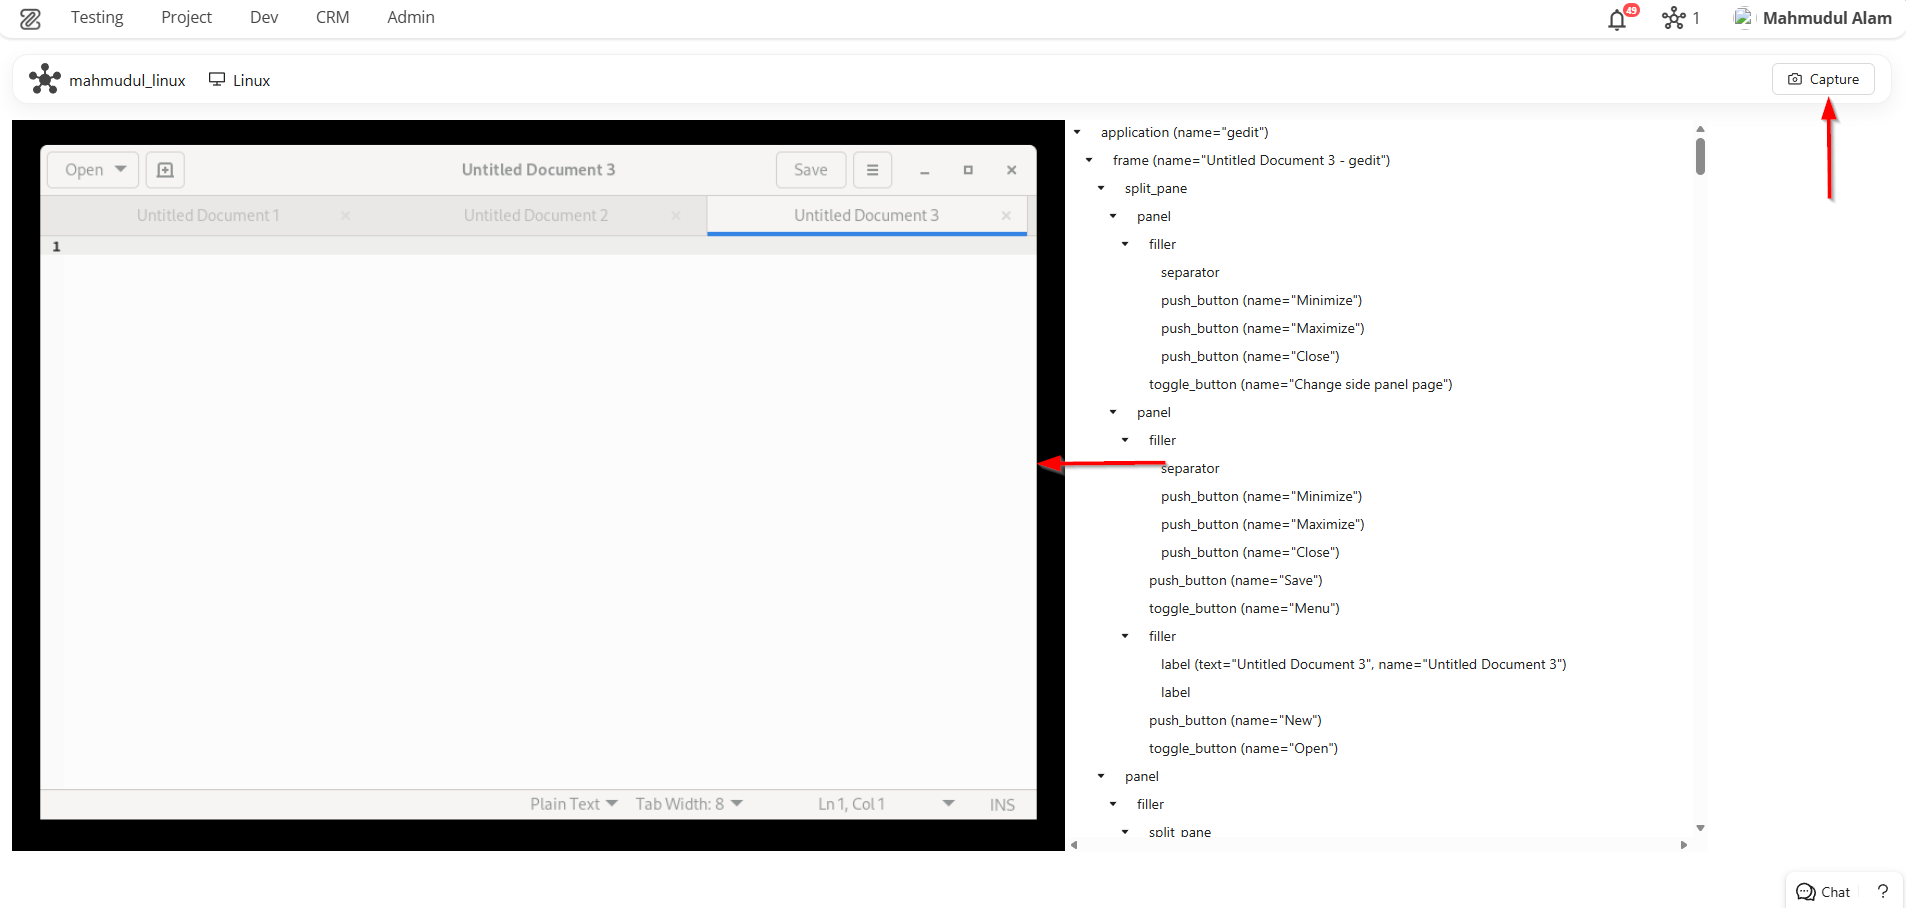
3. Inspecting UI Elements
You can find and select elements in two ways:
- Visual Selection: Hover over and click directly on any UI component within the captured screenshot. An overlay will highlight your selection, and the corresponding node will be focused in the Element Tree.
- Tree Navigation: Expand and navigate through the Element Tree view on the side. Clicking a node in the tree will automatically highlight that element's bounding box on the screenshot.
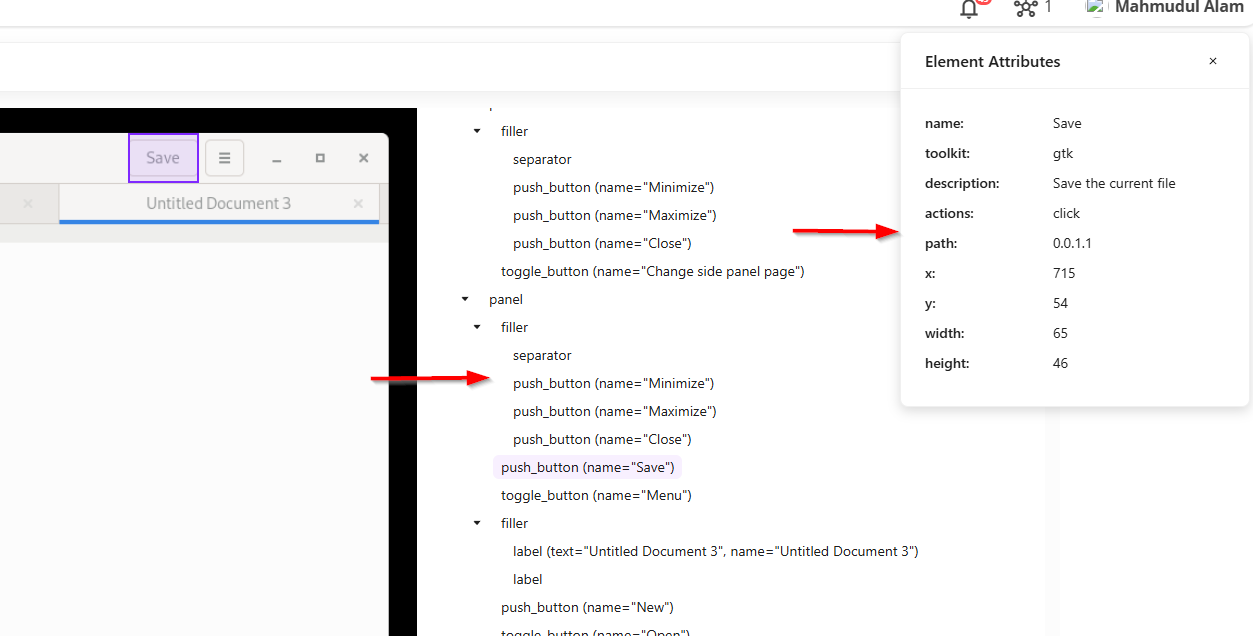
4. Viewing Element Attributes
- Once you select an element, the Attributes Box will appear.
- This box reveals detailed properties of the element (e.g., IDs, classes, text content, bounds). You can use this information to create robust locators for your automated test steps.
- You can close the Attributes Box at any time using its close button.
FAQS / Troubleshooting
FAQs
What should I do if no node is detected by the inspector?
Start a ZeuZ node on the target Linux machine. The inspector polls for an active node and will display the Node ID and platform status once detection succeeds.
Why is the screenshot not updating after I click Capture?
The Capture action takes a fresh screenshot and downloads the UI element tree. If the view does not refresh, verify the node is still connected and retry. Check the network response for errors.
Why can't I select an element by clicking on the screenshot?
Ensure the capture completed successfully and the element tree was downloaded. If the overlay does not highlight, try navigating via the Element Tree instead, or recapture the screen.
The Attributes Box is empty - what should I do?
Reselect the element from the screenshot or the Element Tree. If attributes still do not appear, recapture the screen to refresh the underlying UI tree.
How do I use the captured attributes in a test step?
Copy the relevant properties (IDs, classes, text content, bounds) from the Attributes Box and use them to build locators in your automated test steps.
Troubleshooting
- Permission / Auth Errors (401 / 403): Verify auth token/session, user role, and that requests include required headers/cookies. Check network tab for auth failures.
- Node Not Detected: Confirm the ZeuZ node is running on the target Linux machine and connected to the server.
- Capture Fails or Times Out: Ensure the node has access to the desktop session and the network connection is stable. Retry the capture.
- Element Tree Lazy-Load Failures: Ensure your internet connection is good. Try by reloading the page.
- Stale UI / Cache: If the UI shows an outdated state, perform a hard refresh.
Changelog
- New UI has been introduced. [202604]