Create a Ticket
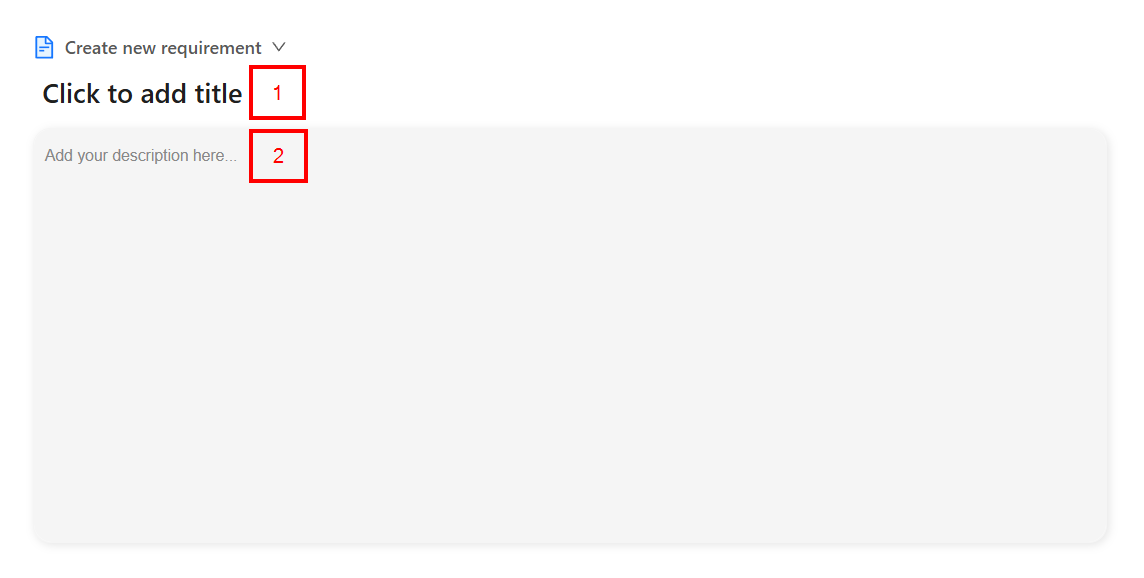
Creating a Ticket refers to the process of formally adding a new work into the system so it can be tracked and managed. A Ticket is created by first selecting the ticket type from the dropdown menu, such as Task, Bug, Requirement, or Document. This selection defines the nature of the work being recorded. The user then provides the main details of the ticket in the central input area, which typically includes the title and description.
Additional settings, including Assignee, Milestone, Version, Feature, Start and End Date, Priority, Privacy, Testing, and Label are configured from the right-hand panel. Finally, clicking the Create button saves the ticket.
Why it matters / Use Cases:
- Centralized Work Tracking: It records a task, bug, requirement, or document in a centralized system for tracking.
- Clear Ownership and Accountability: It ensures ownership by assigning the ticket to a specific user or team.
- Priority Management: It allows prioritization so that important items are addressed first.
- Structured Planning and Alignment: It helps align work with milestones, versions, and features to support better planning.
Prerequisites
- Access to ZeuZ Server with permissions for Project → Ticket → (Requirement, Task, Bug, Document)
- Relevant ticket types, such as Task, Bug, Requirement, or Document, should be enabled.
- Milestones, versions, and features should be predefined for proper linkage.
Quick-Start
- First, click on any one of the ticket types, such as Requirement, Task, Bug, or Document, available under the "Ticket" category.
- The dropdown menu facilitates the selection of a work item category, presenting four distinct options: Requirement, Task, Bug, and Document.
Features
- From the dropdown menu, select a ticket type, such as, Task, Bug, Requirement, and Document.

- Add a Title and a Description for the required task, bug, document, or requirement in the Description box.
-
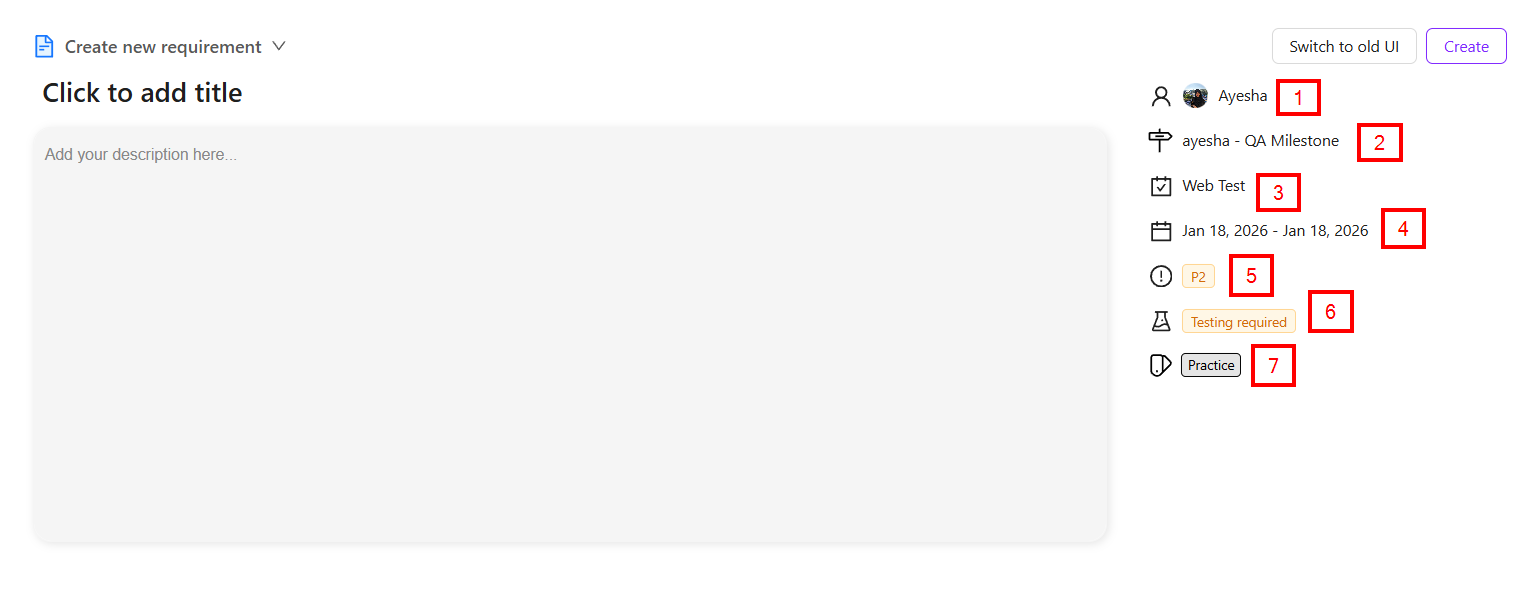
In the case of a Requirement, the Properties panel on the right-hand side displays the following key configuration details:
- Assignee: It indicates who is initially responsible for the requirement. By clicking on the Triage user field, a specific assignee can be selected. Additionally, if the requirement needs to remain under triage, the Set as Triage button can be used.
- Milestone: By default, the milestone remains set to Backlog. By clicking the milestone field, another milestone can be selected from the dropdown menu. Additionally, a new milestone can be created by clicking the Create Milestone button.
- Feature: By default, the feature remains set to Default. To change it, the user can click the Feature button and select a specific feature from the dropdown menu. A feature can also be located by using the search bar.
- Start and End Date: The Start Date and End Date define the planned time period for a work item, such as a requirement. The Start Date indicates when work on the item is expected to begin, while the End Date indicates when the work is expected to be completed. By clicking the Start and End Date field, the deadline for the requirement can be set.
noteIf no date is selected, the current date is automatically selected by default.
- Priority: The priority level can be set to P1, P2, P3, or P4 by clicking the priority dropdown menu.
- Testing: It is used to define whether testing is required for a work item, such as a requirement. A dropdown menu labeled Testing required is displayed. When clicked, it presents two options:
- Testing ignored: Indicates that testing is not needed for this requirement.
- Testing required: Indicates that the requirement must go through a testing process before it can be considered complete.
- Labels: By clicking the Labels button, a label can be applied to the requirement. A label can also be applied by searching for it. By default, the requirement is marked as No labels. Additionally, a new label can be created by clicking the Create Label button.
-
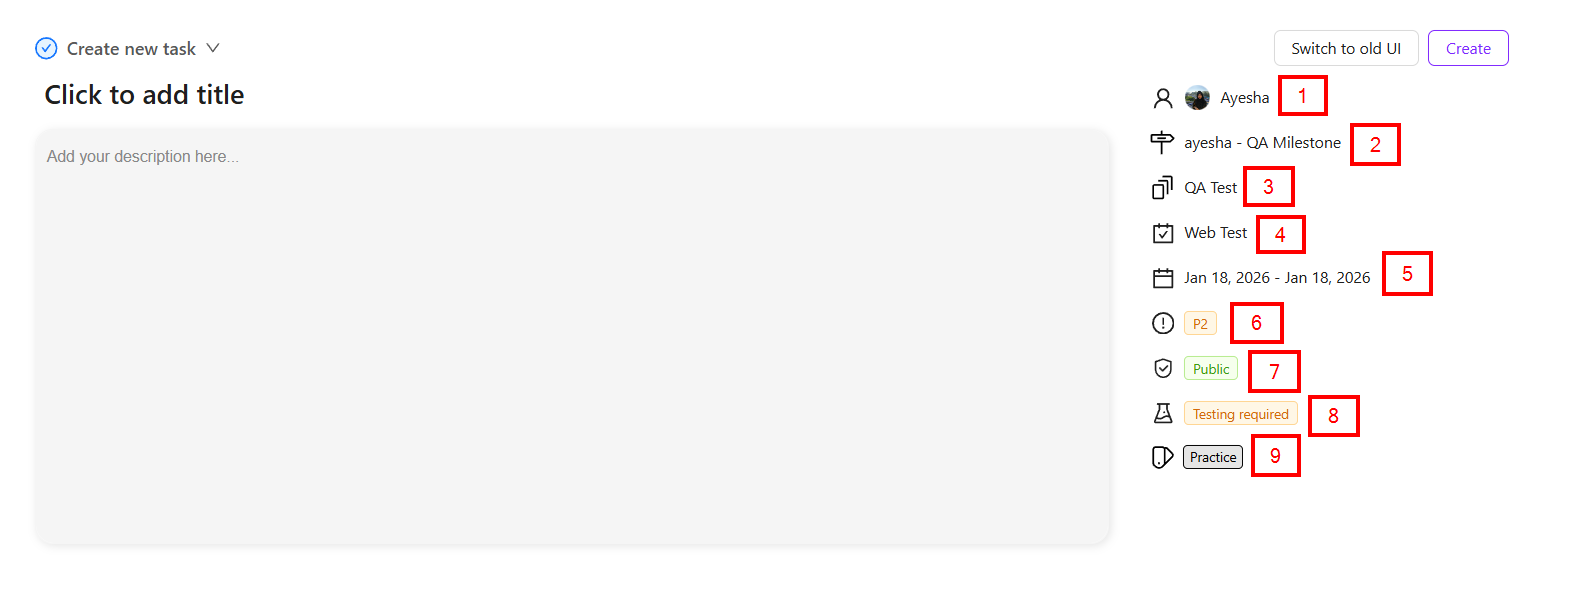
In the case of a Task, the Properties panel on the right-hand side displays the following key configuration details:
- Assignee: It shows the initial responsibility for the task. The assignee can be selected from the user field, or the requirement can remain under triage by using the Set as Triage button.
- Milestone: By default, the milestone is set to Backlog. It can be changed from the dropdown menu or a new milestone can be created using the Create Milestone button.
- Version: By default, the task version is set to Default. A specific version can be selected from the dropdown menu by clicking the Version button, or a new version can be created using the Create Version button.
- Feature: By default, the feature is set to Default. It can be changed from the dropdown menu or found using the search bar.
- Start and End Date: The Start and End Date define the planned duration of a work item. The Start Date marks when work begins, and the End Date marks when it should be completed. It can be set by clicking the respective field.
noteIf no date is selected, the current date is automatically selected by default.
- Priority: The priority level can be set to P1, P2, P3, or P4 by clicking the priority dropdown menu.
- Privacy: A visibility selection dropdown named Privacy, with two options, Public and Private, is available. This setting controls who can view the selected item. When Public is selected, the item is visible to all authorized users, while Private restricts access to specific users only.
- Testing: Testing defines whether a work item requires testing. It provides two options:
- Testing Ignored: It means testing is not needed for the required task.
- Testing Required: It means that the task must be tested before completion.
- Labels: Labels can be applied to a task using the Labels button or by searching for an existing label. By default, the task has No labels, and new labels can be created using the Create Label button.
-
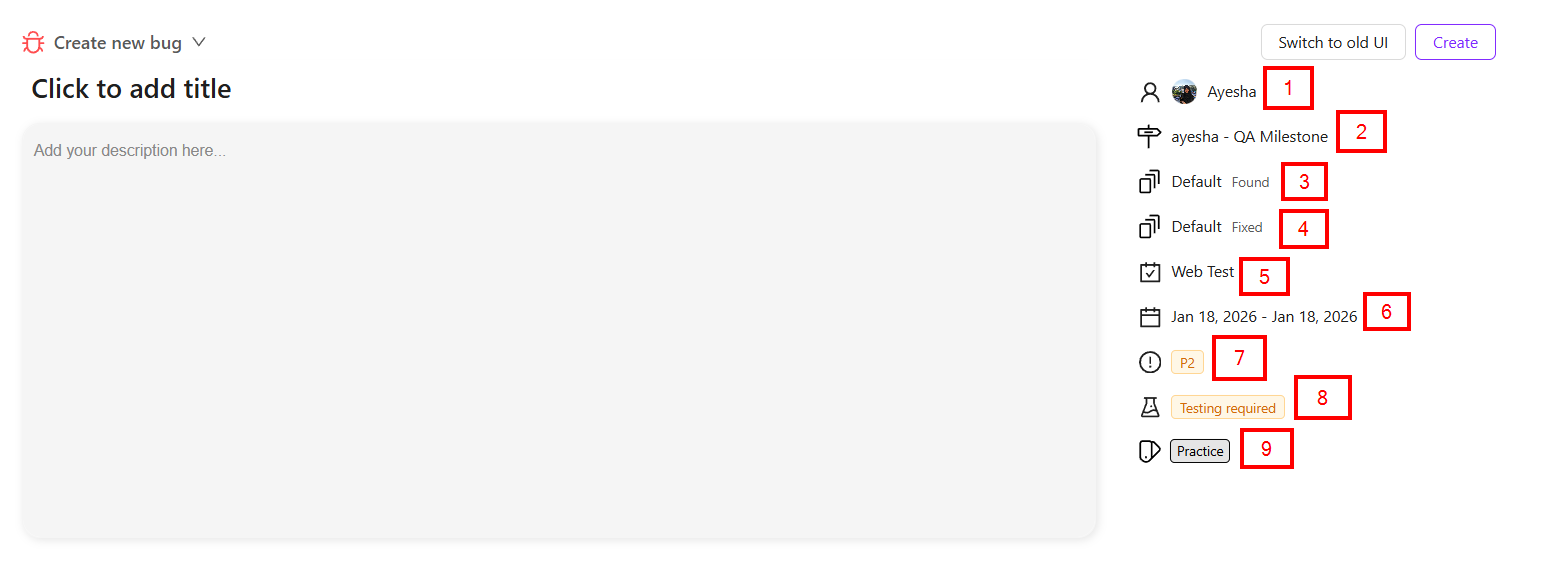
In the case of a Bug, the Properties panel on the right-hand side displays the following key configuration details:
- Assignee: It shows the initial responsibility for the bug. The assignee can be selected from the user field, or the requirement can remain under triage by using the Set as Triage button.
- Milestone: By default, the milestone is set to Backlog. It can be changed from the dropdown menu or a new milestone can be created using the Create Milestone button.
- Found Version: It refers to the specific software version or build in which an issue, such as a bug, was initially identified. Initially, it is set to Default. If it is necessary to create a new Found Version, click the Create Version for Found Version button.
- Fixed Version: It refers to the specific software version in which a reported issue, such as a bug, has been resolved. Initially, it is set to Default. If it is necessary to create a new Found Version, click the Create Version for Fixed Version button.
- Feature: By default, the feature is set to Default. It can be changed from the dropdown menu or found using the search bar.
- Start and End Date: The Start and End Date define the planned duration of a work item. The Start Date marks when work begins, and the End Date marks when it should be completed. It can be set by clicking the respective field.
noteIf no date is selected, the current date is automatically selected by default.
- Priority: The priority level can be set to P1, P2, P3, or P4 by clicking the priority dropdown menu.
- Testing: Testing defines whether a work item requires testing. It provides two options:
- Testing Ignored: It means testing is not needed for the required bug.
- Testing Required: It means that the task must be tested before completion.
- Labels: Labels can be applied to a task using the Labels button or by searching for an existing label. By default, the task has No labels, and new labels can be created using the Create Label button.
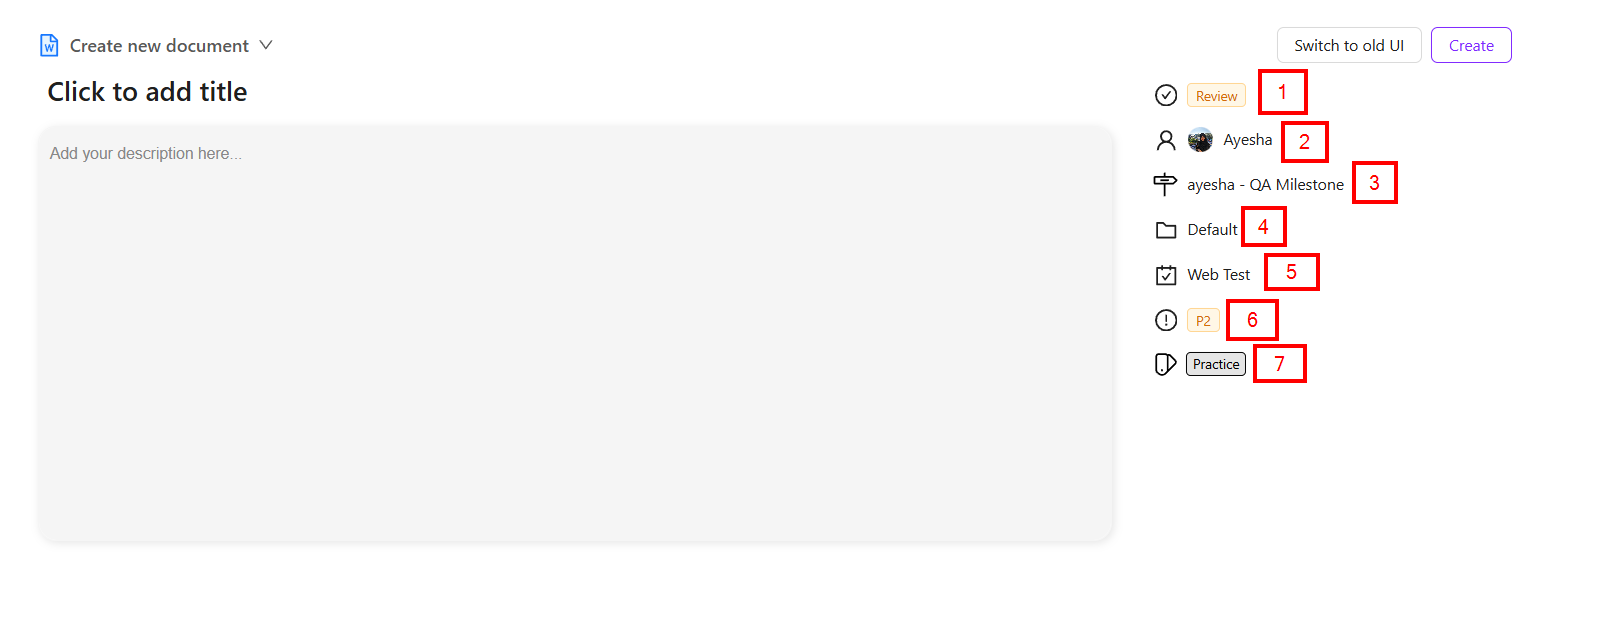
- In the case of a Document, the Properties panel on the right-hand side displays the following key configuration details:
- Status: It is used to indicate the current progress or state of an item, such as a Document. When the dropdown is selected, two status options are visible: Review and Ready.
- Review: It indicates that the item is under evaluation or awaiting feedback.
- Ready: It indicates that the item has completed preparation and is available for the next stage of work.
- Assignee: It shows the initial responsibility for the bug. The assignee can be selected from the user field, or the requirement can remain under triage by using the Set as Triage button.
- Milestone: By default, the milestone is set to Backlog. It can be changed from the dropdown menu or a new milestone can be created using the Create Milestone button.
- Folder: It helps users store documents under a common category, making them easier to locate, manage, and maintain. By default, it remains set to the Default folder. By clicking the field, a folder can be selected, and folders can also be selected by searching through the search bar.
- Feature: By default, the feature is set to Default. It can be changed from the dropdown menu or found using the search bar.
- Priority: The priority level can be set to P1, P2, P3, or P4 by clicking the priority dropdown menu.
- Labels: Labels can be applied to a task using the Labels button or by searching for an existing label. By default, the task has No labels, and new labels can be created using the Create Label button.
- Status: It is used to indicate the current progress or state of an item, such as a Document. When the dropdown is selected, two status options are visible: Review and Ready.
- At the top-right corner, the Create button is used to save the requirement, while Switch to old UI allows returning to the previous interface.

FAQs / Troubleshooting
FAQs
What does the ticket type dropdown represent?
The dropdown allows the user to select the type of ticket to be created, such as Task, Bug, Requirement, or Document. Each type serves a different purpose in work tracking.
What information is required to create a ticket?
At a minimum, a ticket requires a title and ticket type. Additional fields such as description, priority, assignee, and milestone provide better clarity.
Why is selecting the correct ticket type important?
The ticket type defines the workflow and available fields. For example, bug tickets include defect-specific fields, while task tickets focus on general work.
What is the purpose of a ticket description?
The description provides context, requirements, and expectations, helping team members understand the work to be done.
Can attachments be added during ticket creation?
Yes. ZeuZ allows file attachments to support requirements, screenshots, or other reference materials.
Troubleshooting
- Progress shows 100% but testing is not completed: This can happen when development work is marked complete but testing has not yet been executed. The testing status should be updated accordingly.
- Time spent or estimate values look incorrect: This usually occurs if time was logged incorrectly. Users should update time entries using the clock circle icon to ensure accurate tracking.
- Unable to create a ticket: This usually occurs due to missing required fields or insufficient user permissions within ZeuZ.
- Ticket not visible after creation: This may be caused by applied filters, project access restrictions, or incorrect project selection.
- Attachments fail to upload: This may occur due to file size limits or unsupported file formats.
Changelog
- New UI has been introduced [202512]
Related Topics
- User management
- Milestones
- Version
- Create folders and features
- Create test cases
- Label
- GitHub integration