Scheduler
The Scheduler in ZeuZ enables users to automate the execution of Presets or Plans at specified times or defined intervals. It removes the need for manual test triggering and integrates seamlessly into continuous testing workflows.
Why it matters / Use Cases:
- Automate repetitive or time-based test executions.
- Ensure reliable, consistent test runs (hourly, weekly, monthly, or custom intervals).
- Integrate testing into CI/CD pipelines to trigger tests automatically.
- Improve QA efficiency and reduce manual coordination.
- Schedule version-based or milestone-based tests before releases.
Example Use Cases:
- Nightly regression runs to validate system validity.
- Pre-release validation to confirm build integrity.
- Automated weekend load tests.
- Data verification scripts running daily.
Prerequisites
- Access to ZeuZ Server with permissions for Testing → Configure → Scheduler.
- An existing Plan or Preset must be created to associate with the scheduler.
- Defined Milestones and Versions within the workflow.
- A proper environment setup is required for tests to execute successfully.
Quick-Start
- Navigate to the Schedule List page.
- Clicking on the Create Scheduler button, a modal like pop-up will appear. Within this modal, a user can create a scheduler without leaving the current page.
Features
Create a Scheduler
-
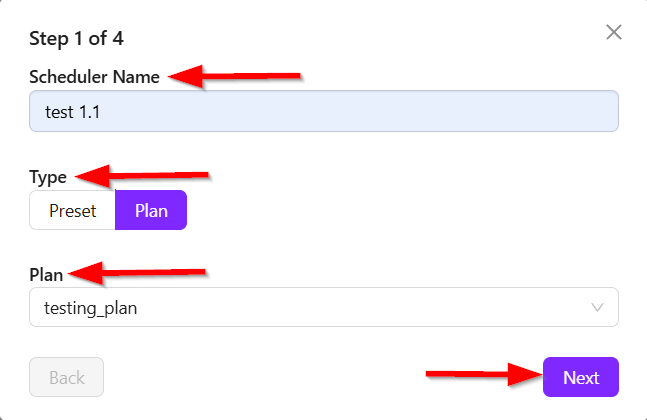
In the first step (Step 1), users are required to fill in the following fields:
- Scheduler Name
- Type
- Preset
- Plan.
For example, we enter the "Schedule Name" as test 1.1, select Plan as the "Type" and choose a Plan. Once these fields are completed, we click the Next button.
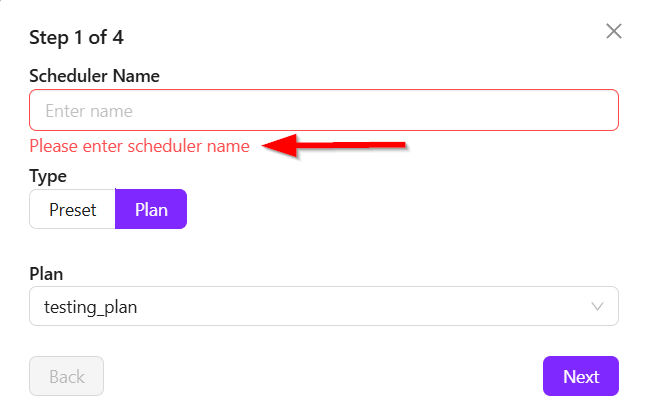
However, if a user tries to proceed without filling out the Scheduler Name or other required fields, the system will block the transition to the next step. All mendatory fields must be filled in before continuing.
-
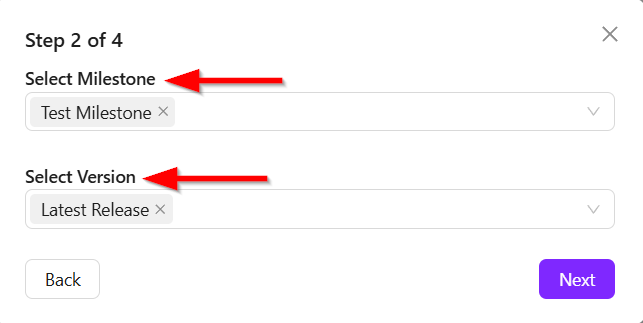
In the second step (Step 2), users must select a Milestone and a Version. Suppose, we select both a Milestone and a Version, and then click on the Next button to move on.
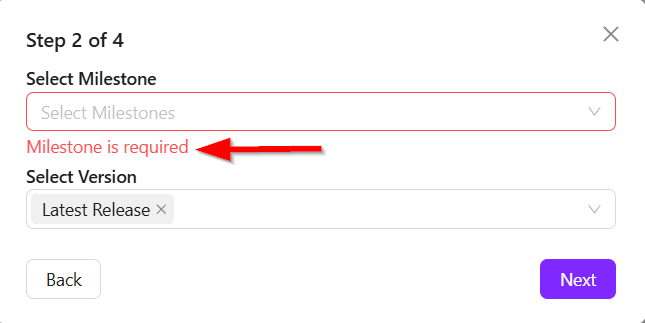
Again, if these are not selected, the user will not be able to proceed to the next step.
-
In the third step (Step 3), users must configure the Schedule Timing. There are five types of scheduling options available:
-
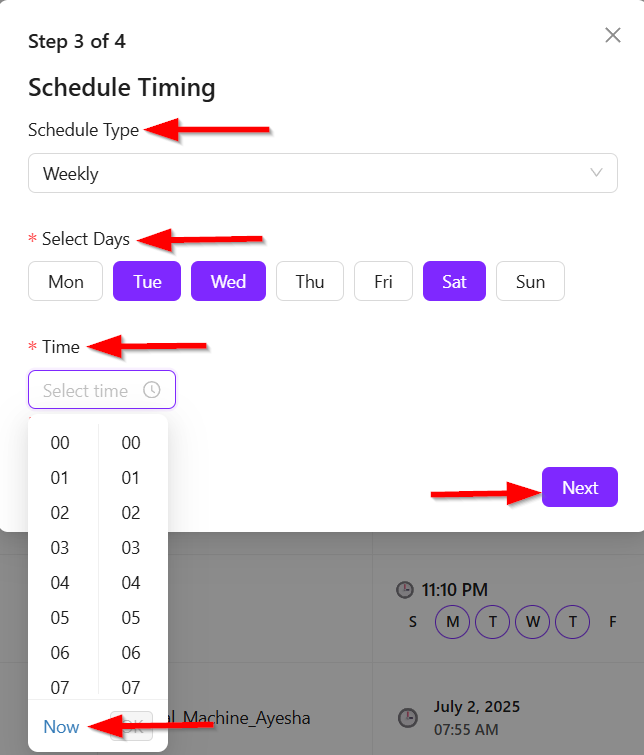
Weekly:
- Users select the days of the week (e.g., Tuesday, Wednesday, Saturday) and a specific time (e.g., the current time using "Now").
- After selecting the Days and Time, clicking the Next button saves the configuration.
-
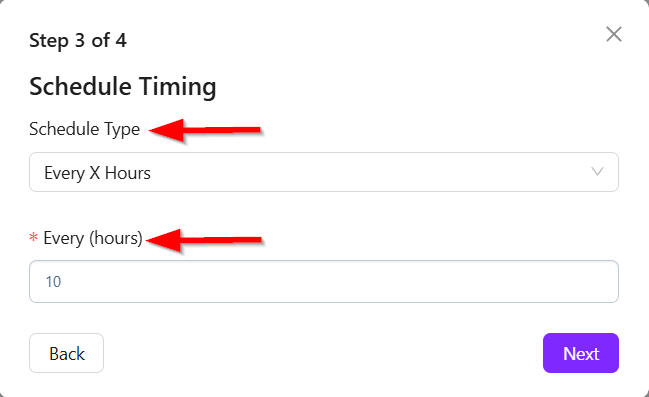
Every X Hours:
- Users set how many hours later the scheduler will run again (e.g., every 10 hours).
-
Every X Minutes:
- Users set how often the scheduler will run in minutes (e.g., every 100 minutes).

-
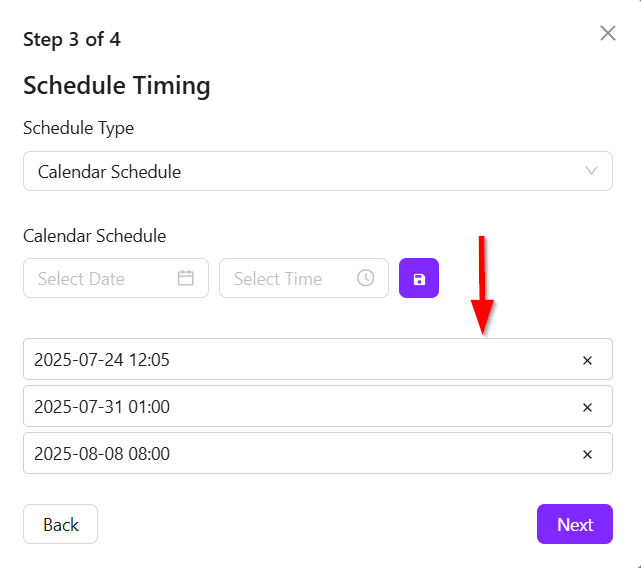
Calendar Schedule:
- Users pick a specific Date and Time from a calender.
- After making the selection, users need to click Add Entry to set the schedule.

- However, multiple entries can be added, for example, one on the 24th July and another on a different date.
-
Month Schedule:
- This allows scheduling the task on specific days of the month (e.g., 6th, 10th, or 15th).
- The day must be between 1 and 30, and a time must be provided.
- For example, we select the 15th at 12:05 and add an additional entry for the 5th at the same time.
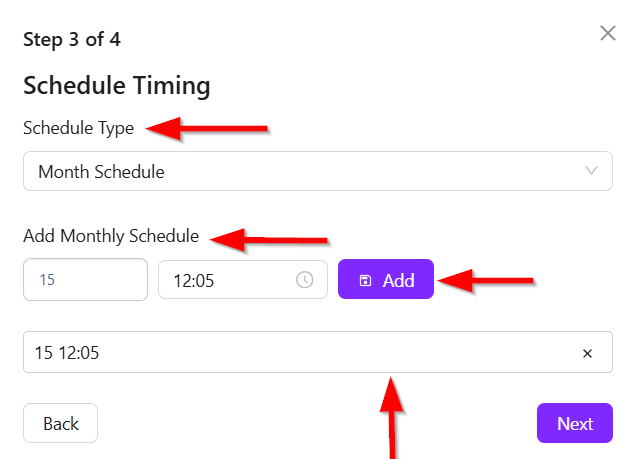
- Multiple entries can be added as needed.

-
-
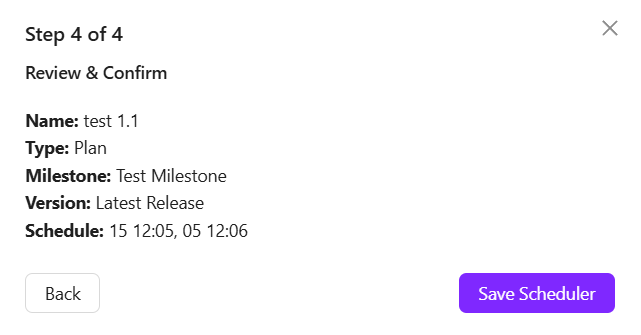
After completing this step, move to the final step (Step 4). Here, Confirmation summary of all the scheduler details is shown including:
- Scheduler Name
- Type (Preset/Plan)
- Selected Milestone and Version
- Scheduled Timing and Entries.
Once everything is confirmed, clicking Save Scheduler will save the scheduler. The page will automatically reload, and the newly created scheduler will appear in the list. For example, if the scheduler was set to run on the 15th at 12:00 and the 5th at 12:06, both entries will be visible as per the configuration.
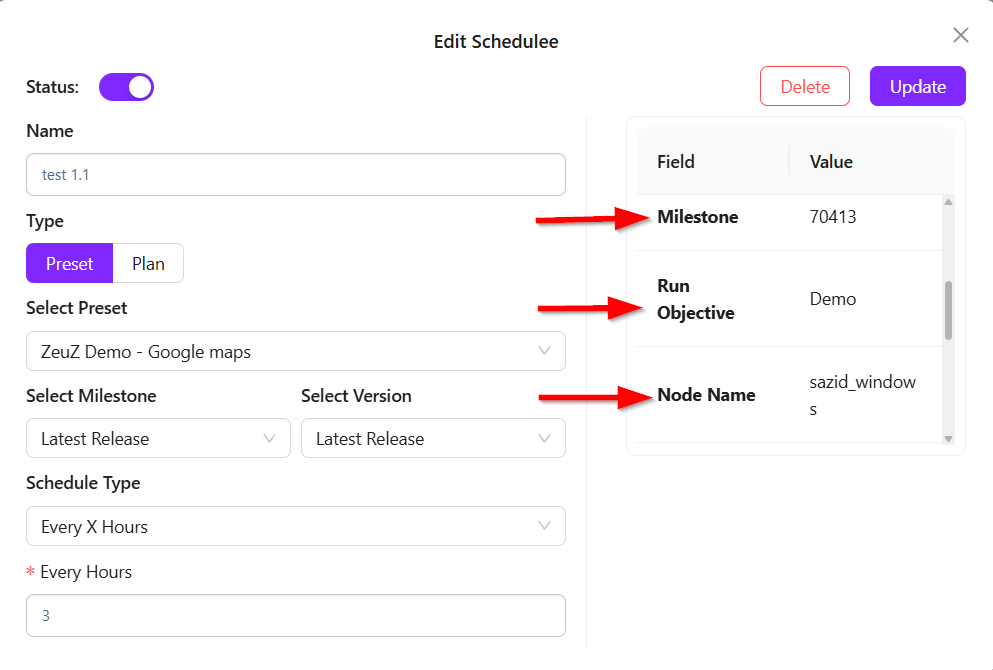
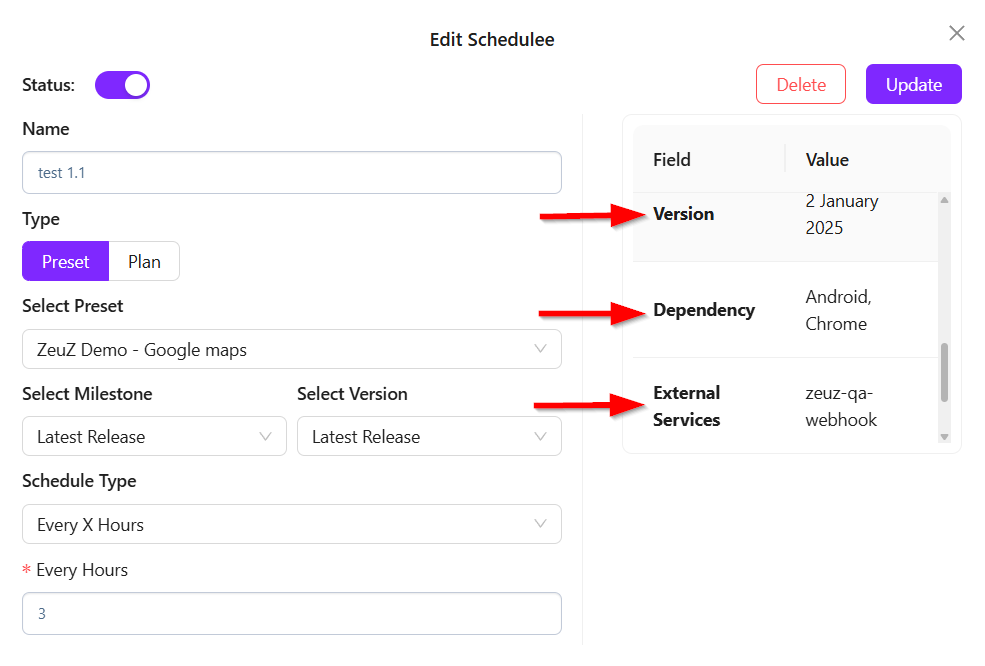
Edit Scheduler
When editing a scheduler in ZeuZ, a scrollable panel appears on the right side of the edit page. This panel contains various fields such as,
- Preset Name
- Assigned Testers
- Send Reports
- Milestone
- Run Objective
- Node Name
- Version
- Dependency
- External Services
- Runtime Parameters.
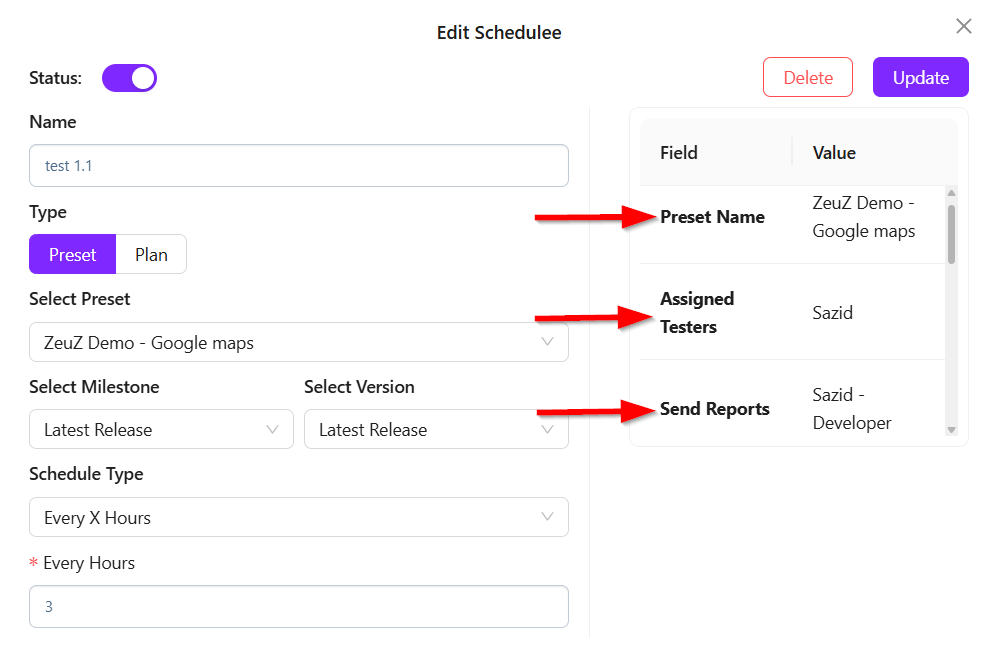
Within the edit view, there is also a Status toggle button. This button allows users to turn the scheduler On or Off. For example, if the scheduler is currently On, clicking the status button will change it to Off. Once the Update button is clicked, the new status is saved.
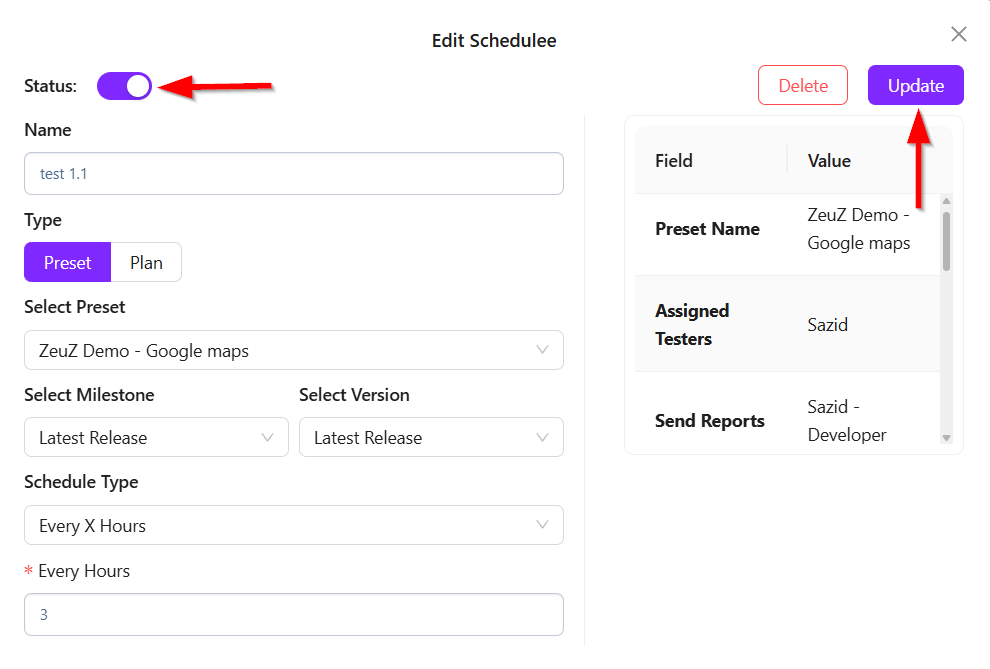
A new status column is also displayed in the scheduler list, aligned with the Scheduler Name. Since the status was recently Off, it is now shown as Off in this column.

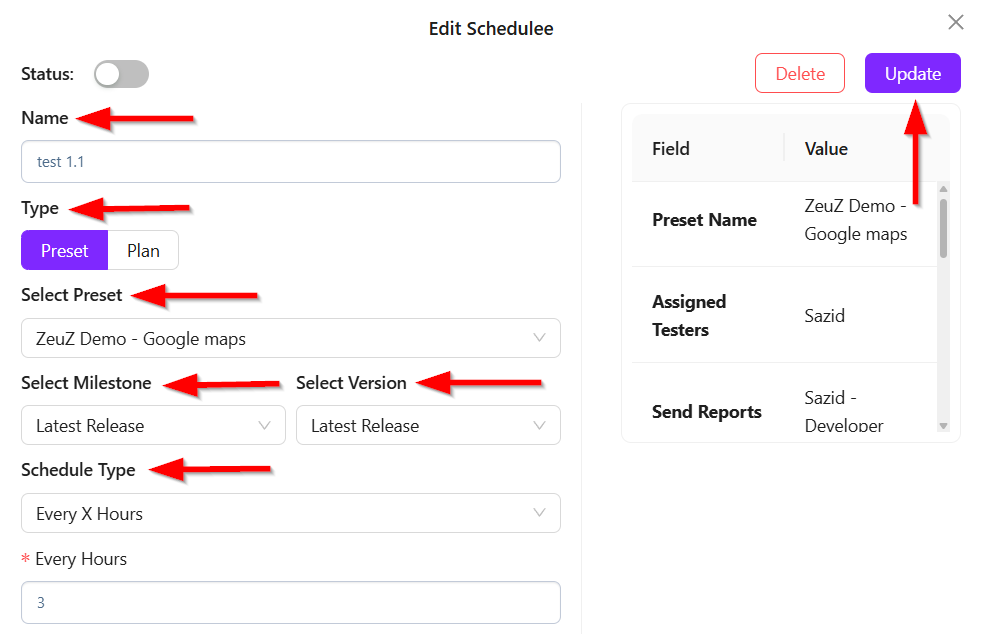
Other editable fields include:
- Name
- Type
- Select (Preset/Plan)
- Select Milestone
- Select Version
- Schedule Type (Weekly, Every X hours, Every X minutes, Calendar schedule, Month schedule).
Users can freely modify these fields. For example, if the current schedule type is set to Month Schedule, the user can change it to Hour or Minute based on their preference. Additionally, a different Preset or Plan and Milestone or Version can be selected. After making all necessary changes, clicking the Update button will save and apply the modifications.
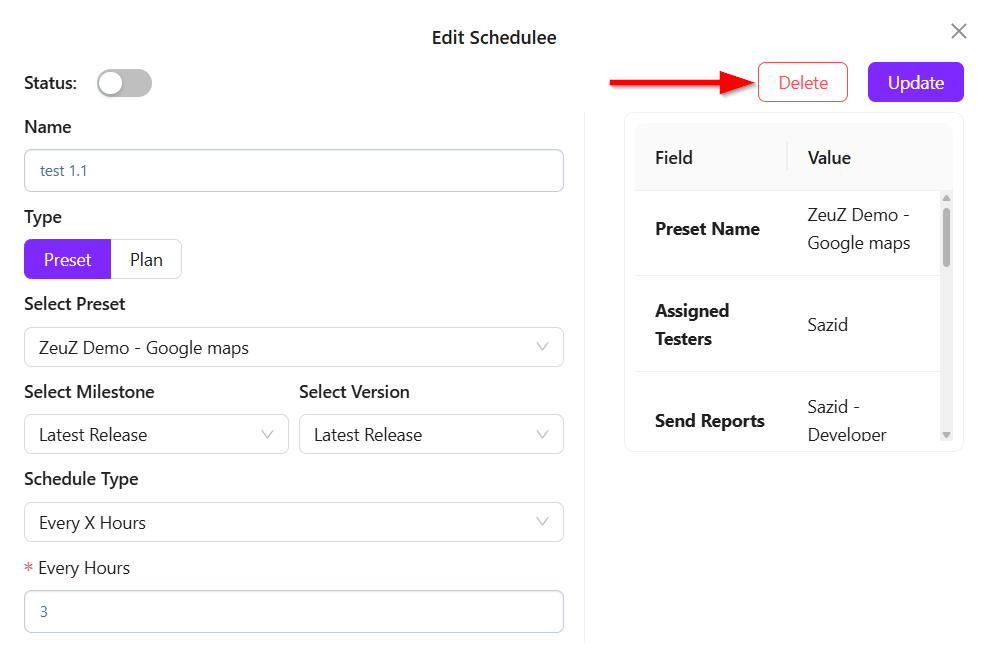
However, to delete a scheduler, a Delete button is available. When clicked, a confirmation prompt will appear asking the user to confirm deletion. If the user clicks OK, the specific scheduler will be permanently deleted.
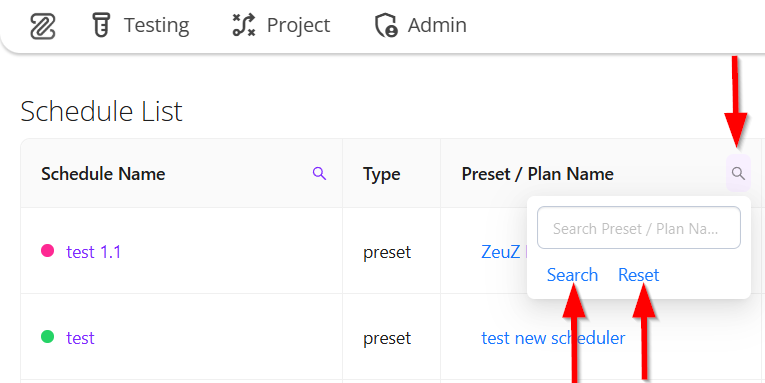
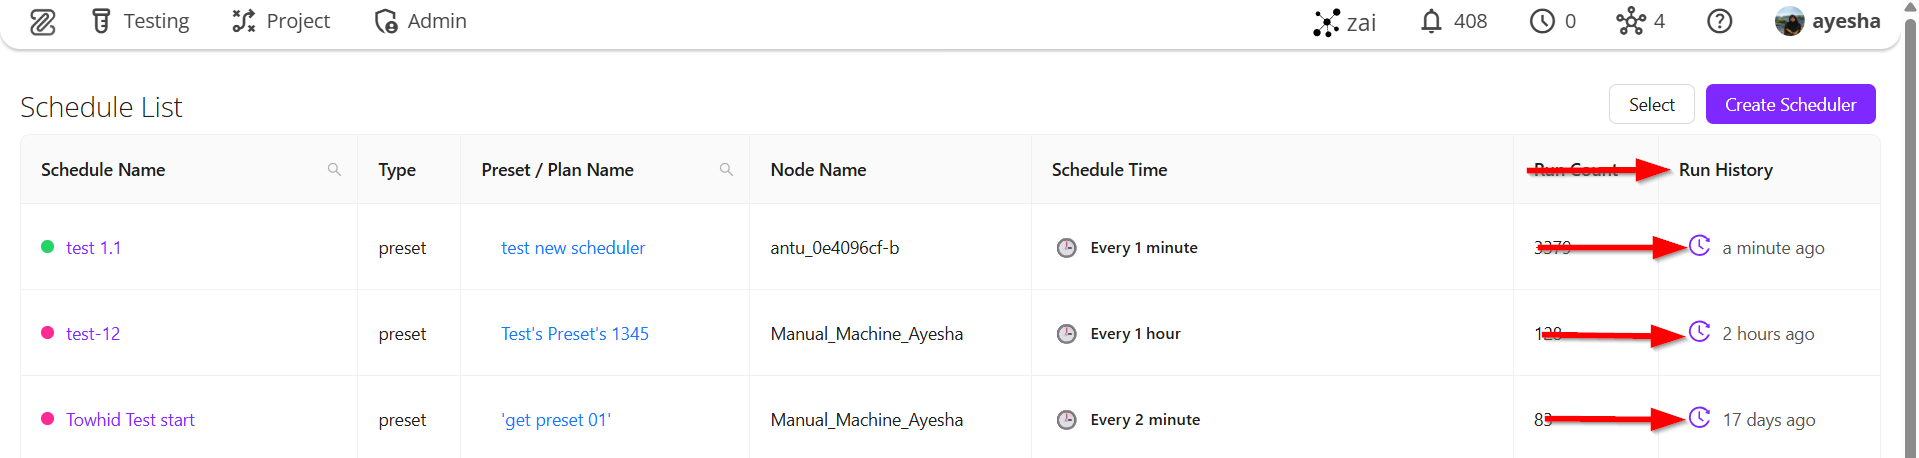
Search Functionality by Scheduler, Preset and Plan Name
With the new update, users can now search schedulers by Scheduler Name, Preset Name or Plan Name directly from the search box. For example:
- Search for schedulers by entering keywords (e.g., "test") in the search box.
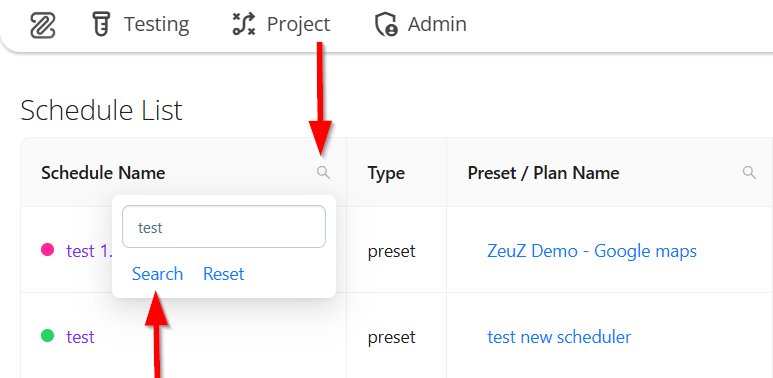
- All the matching schedulers related to the entered keyword will be displayed in the table.
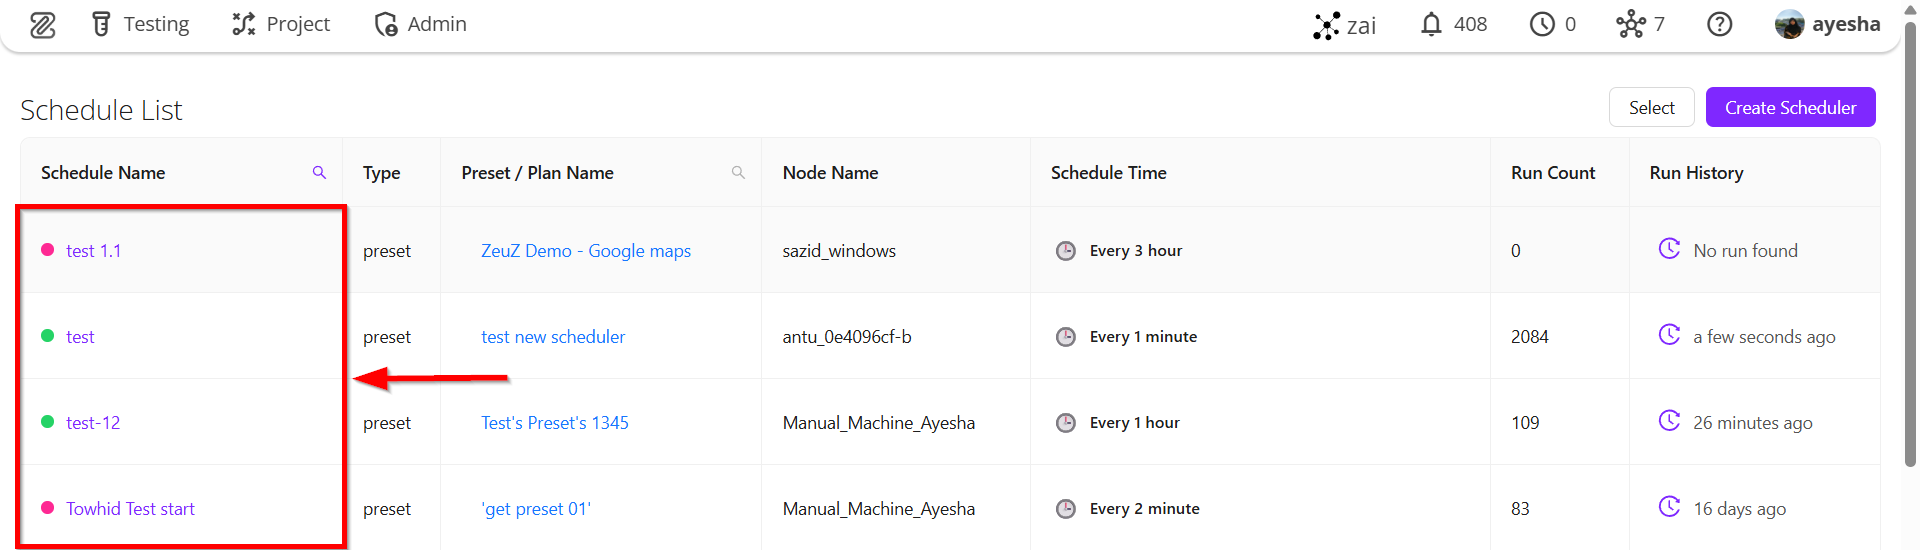
- To return to the complete list, users can click the Reset button, which clears the filter and restores the original view.
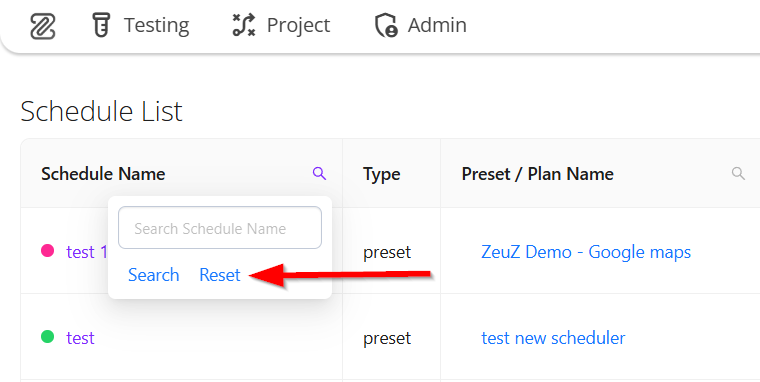
- This functionality is consistent for searching by Preset Name and Plan Name as well.
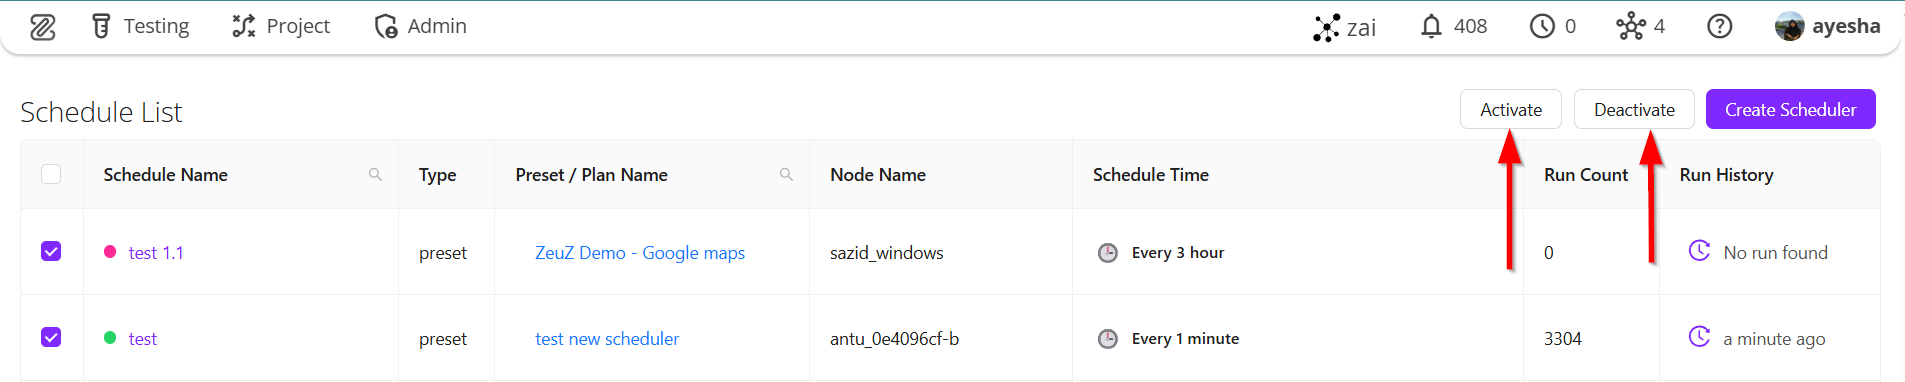
Bulk Status Control with "Select Scheduler" Feature
In case of updated scheduler, a feature called Select has now been introduced to allow bulk activation or deactivation of multiple schedulers at once.
How it Works:
- Users can click the Select button and choose multiple from the table.

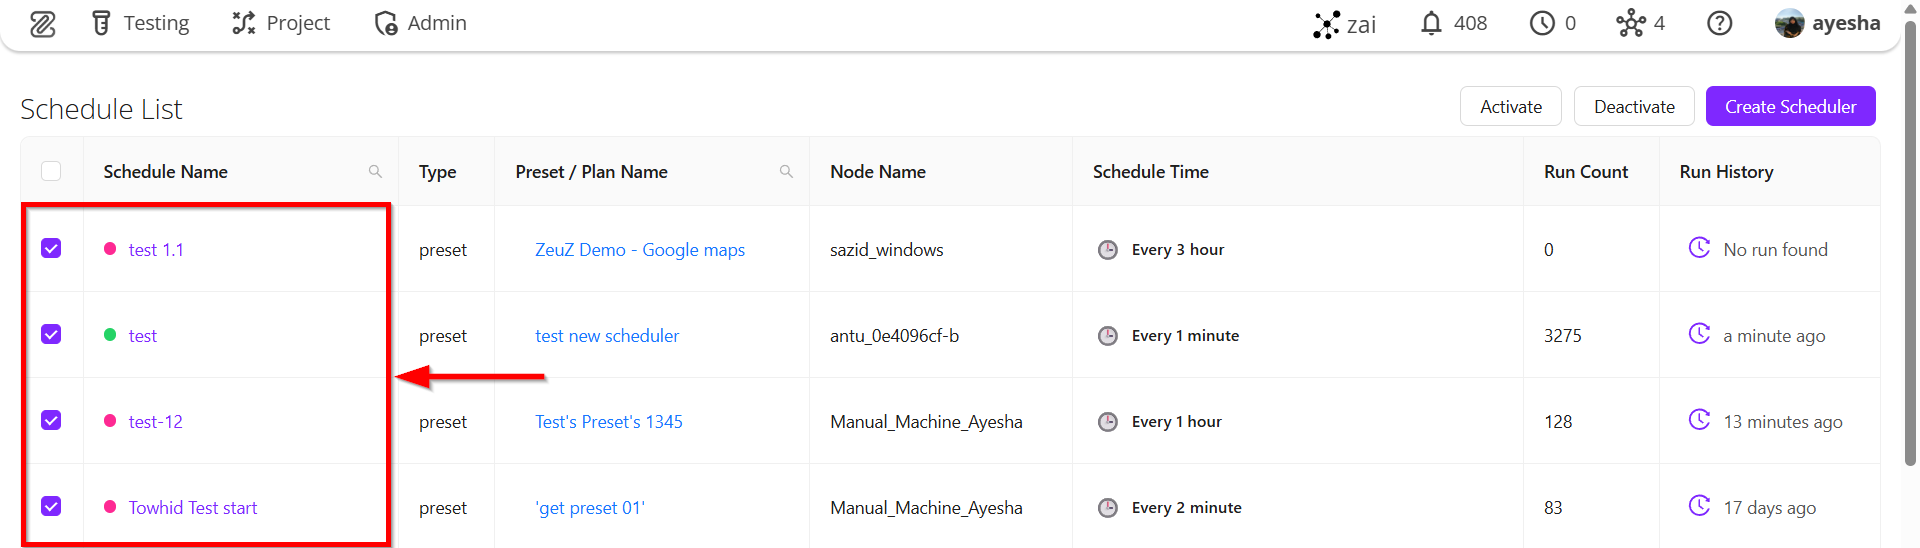
After selections, two options become available:
- Activate: Activates all selected schedulers.
- Deactivate: Deactivates all selected schedulers.
Important Behavior:
- If an active scheduler is selected snd Activate button is clicked, its status remain unchanged.
- If inactive schedulers are selected and Activate button is clicked, their statuses will be updated to active.
- Similarly, selecting schedulers and clicking the Deactivate button will deactivate all selected schedulers.
Schedule Time UI Enhancement
The design of the Schedule Time section has been updated for better usability and clarity. Users will now find it easier to configure and interpret schedule timings.
- For Weekly:

- For Every X Hours:

- For Every X Minutes:
- For Calendar Schedule:
- For Month Schedule:

Run History Page Updates
-
A new unified column has been introduced by merging LRT (Last Run Time) and Run History into a single, consolidated view.
- This column displays the most recent run for each scheduler.
- If a scheduler has never been executed, it shows No run found.

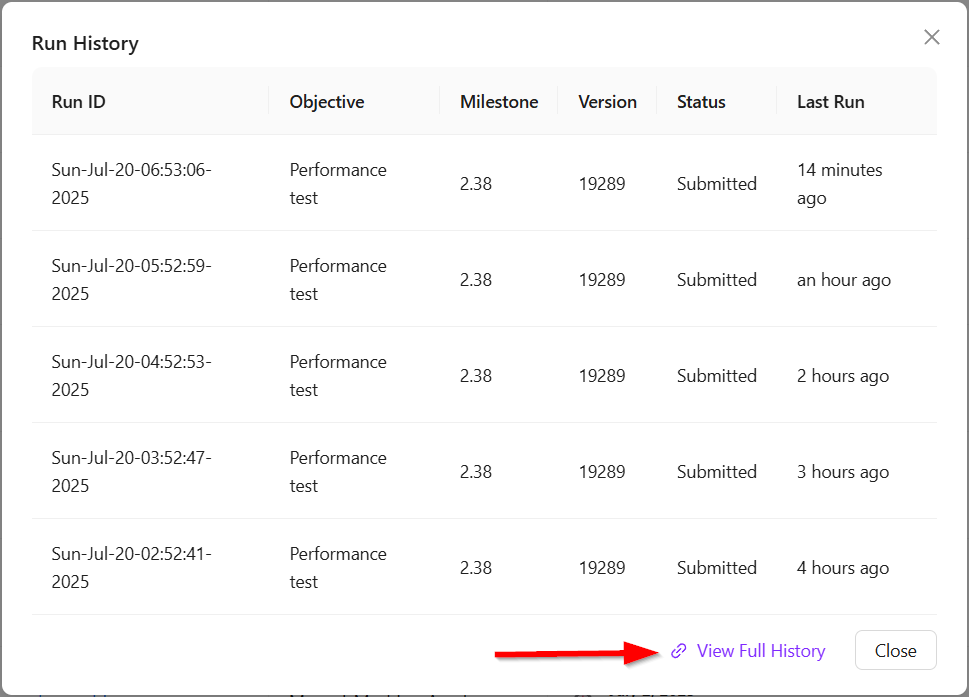
Detailed Run History via modal pop-up
Users can now view a condensed overview of the scheduler's run history via modal pop-up. This modal provides:
- For Presets: The last five executions.
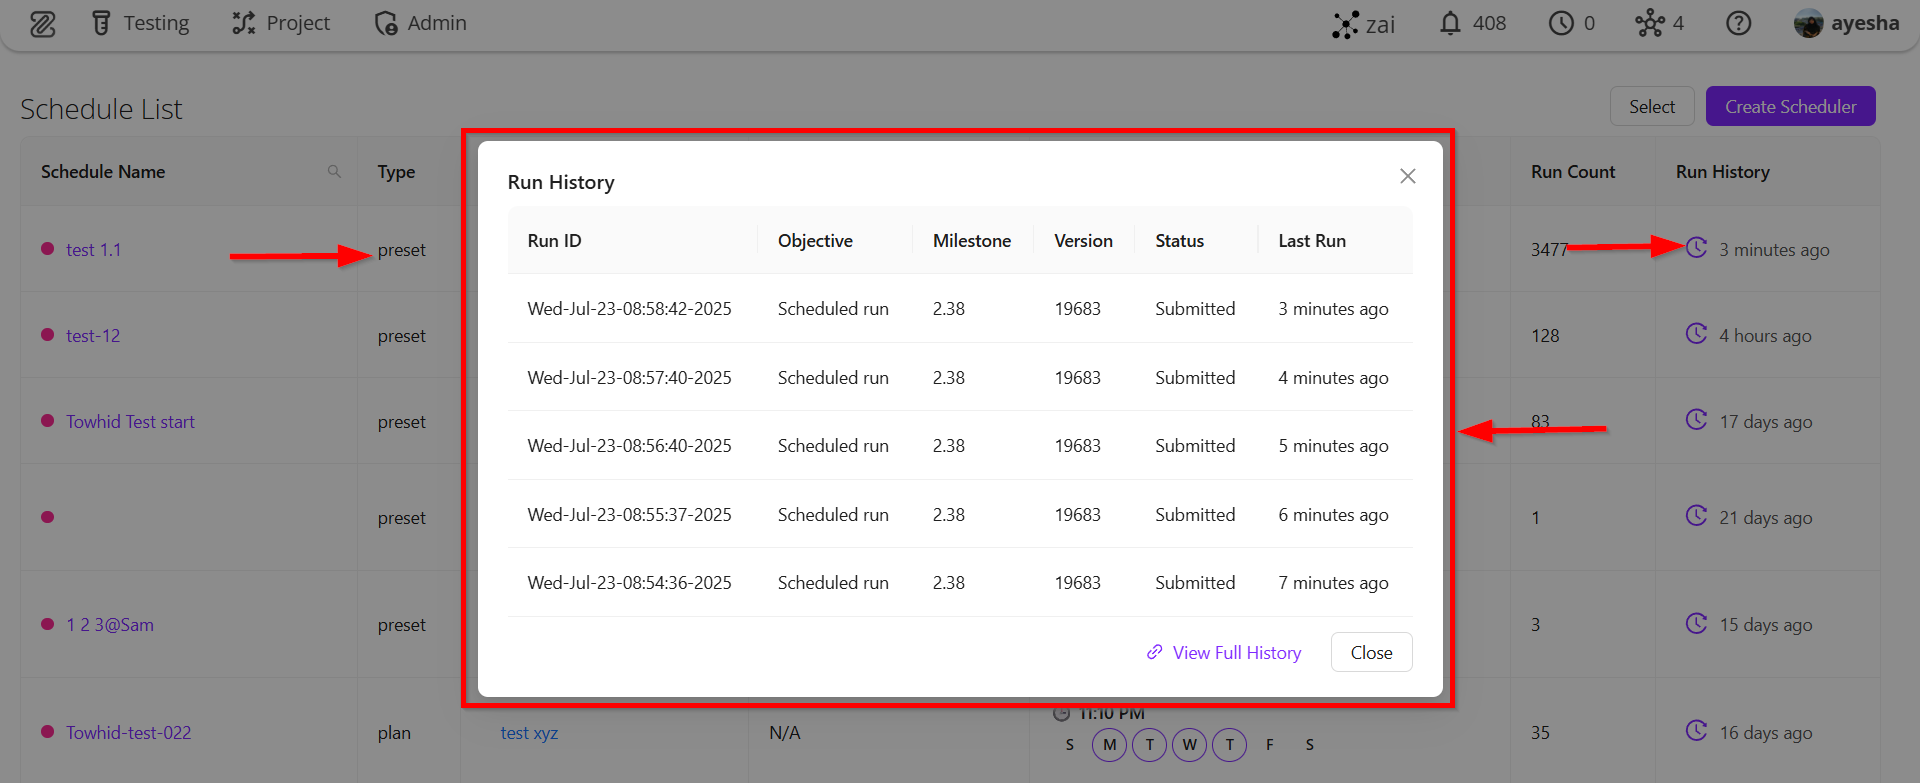
- For Plan: The last two executions of each preset under that plan.
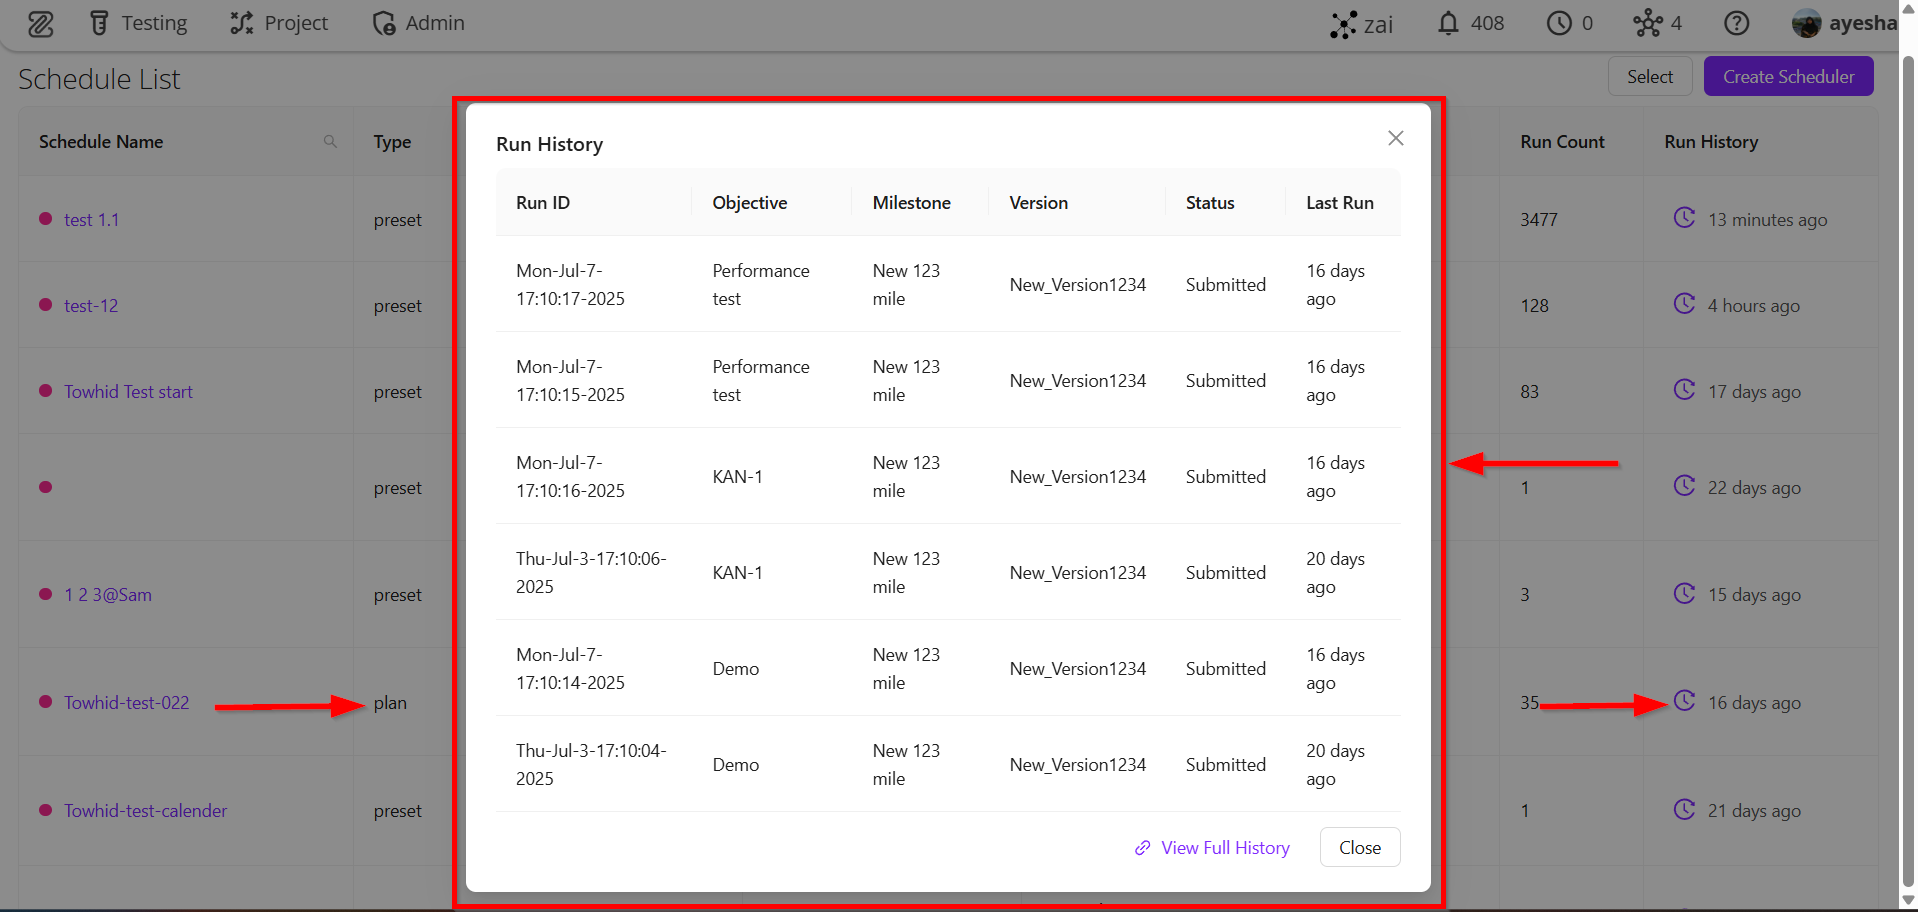
Example: If a scheduler is associated with a Plan containing three Presets, the modal will display the last two run histories for each of those three Presets.
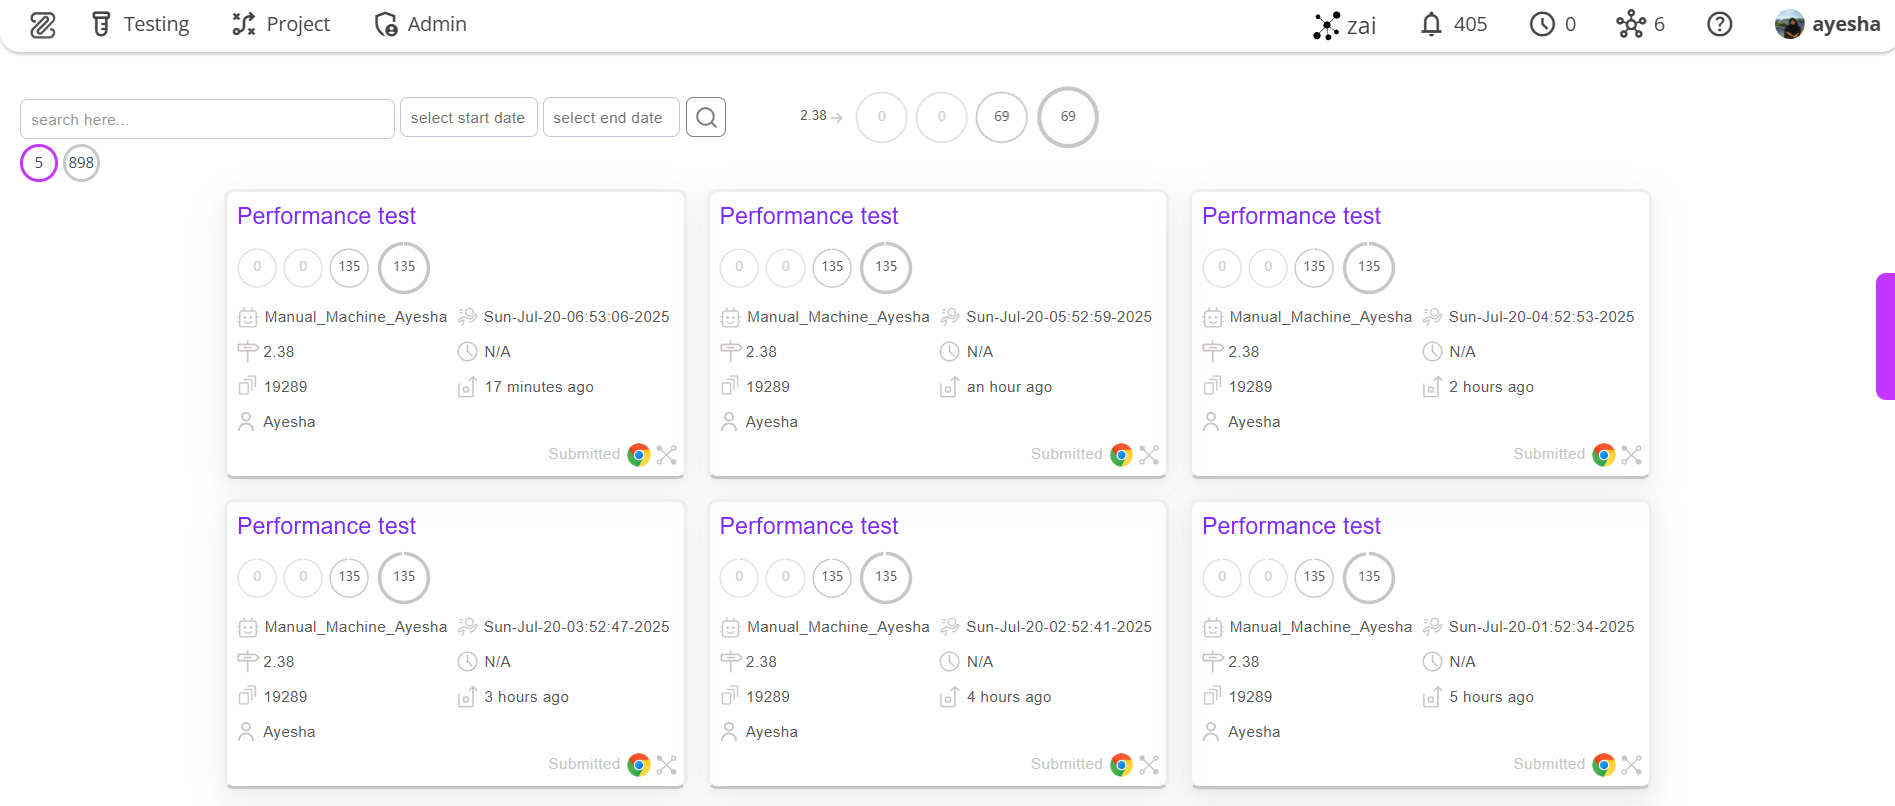
View Full Run History
If users wish to view the Complete History, a View Full History button is available within the modal. Clicking this button redirects the user to the full history page for that specific plan.
FAQs / Troubleshooting
What happens if the required fields (Name, Type, and Milestone) are not filled?
The system prevents progression until all required fields are filled in.
Can I schedule for multiple times or dates?
Yes, for Weekly, Calendar, and Monthly schedules, multiple entries can be added.
What happens when I deactivate a scheduler?
It stops executing until it is manually reactivated.
How can I verify the recent runs?
Check the Unified History column to view the run history.
Can I update multiple schedulers in bulk?
Yes, use the Bulk Activate or Deactivate options.
Changelog
- UI Enahancement: Improved Schedule Time configuration flow [20250712]
- Run History: Unified column and modal pop-ups added [20250712]
- Bulk Actions: Activating or deactivating multiple schedulers are supported [20250712]
- Search: Dynamic search and filter by multiple fields [20250712]